

-
Folks, if you've recently upgraded or renewed your annual club membership but it's still not active, please reach out to the BOD or a moderator. The PayPal system has a slight bug which it doesn't allow it to activate the account on it's own.
You are using an out of date browser. It may not display this or other websites correctly.
You should upgrade or use an alternative browser.
You should upgrade or use an alternative browser.
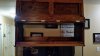
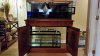
Juano's 75 Gallons "The Re-Build"
- Thread starter Juano908
- Start date
- Status
- Not open for further replies.
Looks great Juan! Very well done. I really like the rounded routing work on the inside of the door frames. Gives it a really nice touch.
Thanks guys and yes George, the rounded routing on the doors make it looks different, even though the routing on the stand doors are square cause my friend used a molding he made himself.
For the light I'm thinking to build a rail of aluminum angles so the lights just sits on it, the way is not difficult to remove them in case I need to...I'll post pics of it too later on.
For the light I'm thinking to build a rail of aluminum angles so the lights just sits on it, the way is not difficult to remove them in case I need to...I'll post pics of it too later on.
Thanks Judeo.Juan, looks fantastic! cant wait to see this get wet!
Thanks and yes it is open, here's a pic.Amazing job!!! One question though, is the backside of the canopy open? If not, you will need more ventilation as condensation from warmer water will wreak havoc on your lights.
Attachments
I used aluminum angles to support my LED fixtures and it works great. If you do it, I'd recommend having a center support though because without it, the weight of the fixtures will make the angle sag over time. It doesn't have to be real wide, just something to support the weight in the middle. It will be so close to the fixture that it won't give you any shadow effects or anything either.
Here are a couple pics of how I did mine:


The fixtures just sit right on the rails and can slide along it to position just where you want them.
Here are a couple pics of how I did mine:
The fixtures just sit right on the rails and can slide along it to position just where you want them.
I was thinking to do something similar to what you did but without any support in the center, I've seen your pictures before so I took the idea from you George, lol...I used aluminum angles to support my LED fixtures and it works great. If you do it, I'd recommend having a center support though because without it, the weight of the fixtures will make the angle sag over time. It doesn't have to be real wide, just something to support the weight in the middle. It will be so close to the fixture that it won't give you any shadow effects or anything either.
Here are a couple pics of how I did mine:
View attachment 10371View attachment 10372
The fixtures just sit right on the rails and can slide along it to position just where you want them.
Thanks Mike.Nice looking Juan....
Soon I’ll be moving to the new setup and I need some ideas, suggestions from people with experience doing this transfer…..take in consideration that the new setup is going where my current setup is right now and that I don’t have enough space to keep the two tanks running.
I’ll use 100% new water and new sand, thanks a lot in advanced.
I’ll use 100% new water and new sand, thanks a lot in advanced.
As you may know, I am current transferring to a new tank too. I have the two tanks connected and equalize the water over a few days. The reason for this is new water (IO regular) has 11.4 Alk which is 4 dkh higher than my running Alk level. So I do suggest you to use some of the old water at least to avoid any shock to the corals.
Ok Joe, so maybe 20 -30% tank water and the rest new water.As you may know, I am current transferring to a new tank too. I have the two tanks connected and equalize the water over a few days. The reason for this is new water (IO regular) has 11.4 Alk which is 4 dkh higher than my running Alk level. So I do suggest you to use some of the old water at least to avoid any shock to the corals.
Sure Jun, thanks bud.Hey Juan, if you need a hand just let me know.
Hey Juan, if you need a hand just let me know.
same here bro, let me know if you need help.
Thanks Judeo, I just finished gluing the plumbing and started filling it with water for a test run.same here bro, let me know if you need help.
- Status
- Not open for further replies.