Hello everyone, I would like to share with you all my 300 gallon upgrade build. I recently had a Oceanic 156 gallon tank which measured 60"w x 24"d x 25"h. I broke the tank down about 2 weeks ago and moved all livestock into 2 holding tanks that have been set up for a while, a 80 gallon frag tank and a 65 gallon RR which are both plumbed on the same sump.
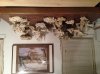
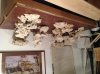
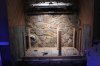
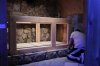
This past weekend I worked on the stand and got a decent amount done with the help of a coworker. We worked day and night to get where I am at now. I built the stand out of a 2x4 bottom and a 2x6 top which measures 74"w x 38". We then supported each corner with two 2x6's which are backed by 2x4's. I then added a 2x6 offset from the center of the stand which is also backed by a 2x4 since I want 2 big doors on the left and 1 on the right. I wrapped the whole stand in 3/4" maple and I'm going to finish it with a high gloss black finish with numerous coats of polyurethane. The stand measures 36" high since it will have all equipment in the stand. I wanted it high for skimmer clearance and ease to work inside.
I will document all my work that is done from this day forward. I would appreciate any advice and compliments given. Ok so, on to the build....
Equipment
Tank - Marineland 300DD 3 sided starphire w/corner overflows
Stand - Custom black maple 74" x 38" x 36"
Lighting - DIY led fixture 60 RB & 36 CW with 2 48" t5's and 2 60" t5's
Sump - 80 gallon frag tank
Vertex 7" filter sock holder
Skimmer - SWC 230
Refugium - 29 gallon high
Pump - Reeflo dart
Apex controller
MTC Pro Cal reactor
2 TLF 550 reactors [Carbon & Gfo]
Two vortech mp40's
Two Jabeo Wp-60's
Two Jabeo Wp-40's
Environment
Mixed reef
300 lbs Tropic Eden Reefflakes
150-200 lbs of Marco,Pukani,Shelf & Branch rock [Going for a open look]
")