

-
Folks, if you've recently upgraded or renewed your annual club membership but it's still not active, please reach out to the BOD or a moderator. The PayPal system has a slight bug which it doesn't allow it to activate the account on it's own.
You are using an out of date browser. It may not display this or other websites correctly.
You should upgrade or use an alternative browser.
You should upgrade or use an alternative browser.
Inherited 90
- Thread starter redfishbluefish
- Start date
Thanks for the kind words.
James @JRWOHLER , the finished bracket just happens to be painted flat black:
John @jgraz , most clementine crates my wife brings home are a thin cheesy looking plywood. This solid wood one was a rare find. I have some of this thin plywood as well, and out of curiosity, I just coped a piece. It cuts like paper, so very easy to cut compared to solid wood...but it's too thin. I snapped the one end. However, I think this stuff would work if you glue two together. Then again, you could simply go to HD and buy a foot of 3/16" flat molding stock.

So I do want to make a second one, and I just glued up two of the plywood clementine boards....so I'll have to let you know it they work, doubled up. Clamped in a vise right now until tomorrow...to allow the glue to dry.
James @JRWOHLER , the finished bracket just happens to be painted flat black:

John @jgraz , most clementine crates my wife brings home are a thin cheesy looking plywood. This solid wood one was a rare find. I have some of this thin plywood as well, and out of curiosity, I just coped a piece. It cuts like paper, so very easy to cut compared to solid wood...but it's too thin. I snapped the one end. However, I think this stuff would work if you glue two together. Then again, you could simply go to HD and buy a foot of 3/16" flat molding stock.

So I do want to make a second one, and I just glued up two of the plywood clementine boards....so I'll have to let you know it they work, doubled up. Clamped in a vise right now until tomorrow...to allow the glue to dry.
Equipment Cabinet - Finally!
If you go back to my very first post in this build thread, I posted a "to-do list," and number one on that list was to build the equipment cabinet.....that post is dated November 29, 2010. I'm just getting around to building it now, over five years later. In the process I discovered a couple things (other than I'm a hell of a procrastinator), one being how my simple brain works....or doesn't work. What held me up for years was mulling over the design as I thought about this in the classical way of building a cabinet....build a box and cover it with a faceframe. And that's were I struggled...I couldn't design what I wanted in the box. That is, until I recently thought about first building the faceframe and then the box. This one change in approach almost immediately clarified by design.
To start the faceframe, I went to HD and purchased what I thought was 1x3 stock. This actually should measure 3/4 by 2 1/2 inches. The 2 1/2 was right on, but the thickness was slightly less. That's when I discovered the wood came from Chile. I scratched my head and wondered why we are importing pine....don't we make anything anymore? Pine is a wood that readily grows here and is now farmed as well, as a renewable resourse.
The reason I bring up the thickness is that I planned on a wider base rail using a regular pine board (3/4 inch thick), and a wide plywood mid rail as well. So for the base rail, I had to run that through the planner to thin it down to the same thickness. For the plywood, I was able to find a piece of oak furniture grade I had that also was the right thickness. The reason for the plywood mid rail is the width. If done in pine, the wide width would be problematic as the wood expanded and contracted with changes in moisture. Plywood is much more stable. All faceframe pieces were drilled with the Kreg.
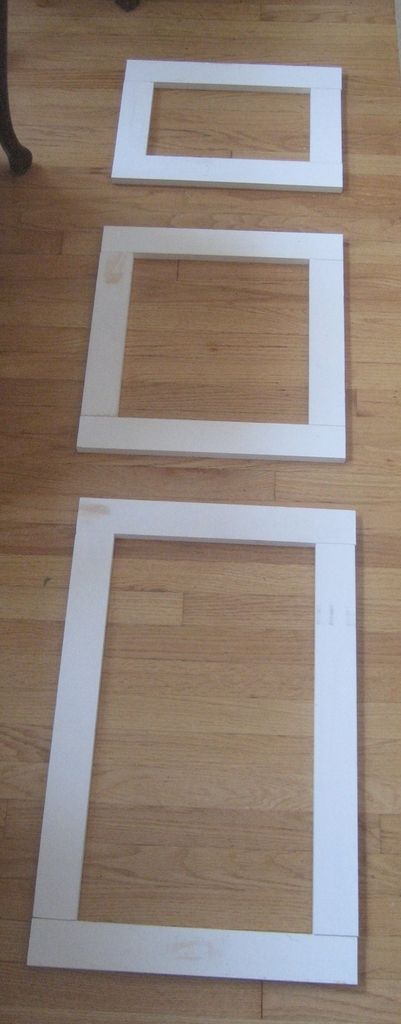
Here is the frame laid out....no screws or glue yet (NOTE, picture purposely posted sideways.)
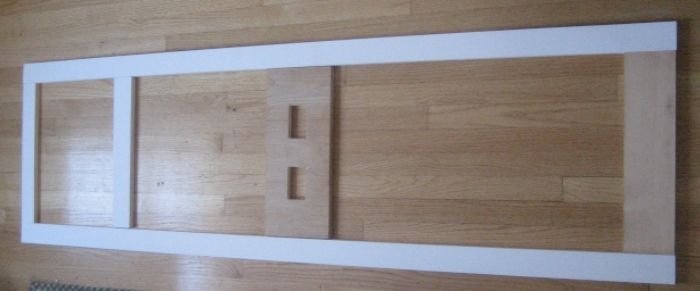
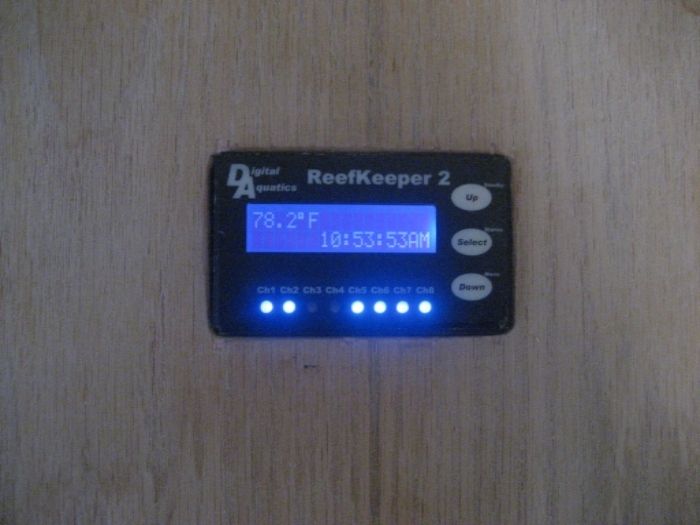
The retangular cut-outs in the plywood mid rail are for two ReefKeeper 2 head units:
So I'm finally on my way!
The next step is to modify the right stile to fit the stand and wrap around the canopy. That's what happens when stand, canopy and side equipement cabinet aren't designed together.
If you go back to my very first post in this build thread, I posted a "to-do list," and number one on that list was to build the equipment cabinet.....that post is dated November 29, 2010. I'm just getting around to building it now, over five years later. In the process I discovered a couple things (other than I'm a hell of a procrastinator), one being how my simple brain works....or doesn't work. What held me up for years was mulling over the design as I thought about this in the classical way of building a cabinet....build a box and cover it with a faceframe. And that's were I struggled...I couldn't design what I wanted in the box. That is, until I recently thought about first building the faceframe and then the box. This one change in approach almost immediately clarified by design.
To start the faceframe, I went to HD and purchased what I thought was 1x3 stock. This actually should measure 3/4 by 2 1/2 inches. The 2 1/2 was right on, but the thickness was slightly less. That's when I discovered the wood came from Chile. I scratched my head and wondered why we are importing pine....don't we make anything anymore? Pine is a wood that readily grows here and is now farmed as well, as a renewable resourse.
The reason I bring up the thickness is that I planned on a wider base rail using a regular pine board (3/4 inch thick), and a wide plywood mid rail as well. So for the base rail, I had to run that through the planner to thin it down to the same thickness. For the plywood, I was able to find a piece of oak furniture grade I had that also was the right thickness. The reason for the plywood mid rail is the width. If done in pine, the wide width would be problematic as the wood expanded and contracted with changes in moisture. Plywood is much more stable. All faceframe pieces were drilled with the Kreg.
Here is the frame laid out....no screws or glue yet (NOTE, picture purposely posted sideways.)

The retangular cut-outs in the plywood mid rail are for two ReefKeeper 2 head units:

So I'm finally on my way!
The next step is to modify the right stile to fit the stand and wrap around the canopy. That's what happens when stand, canopy and side equipement cabinet aren't designed together.
Last edited:
I did all the cutting on the stile and the canopy and stand and glued and screwed the face frame together. I'm going to like this! Here it's just resting in place.
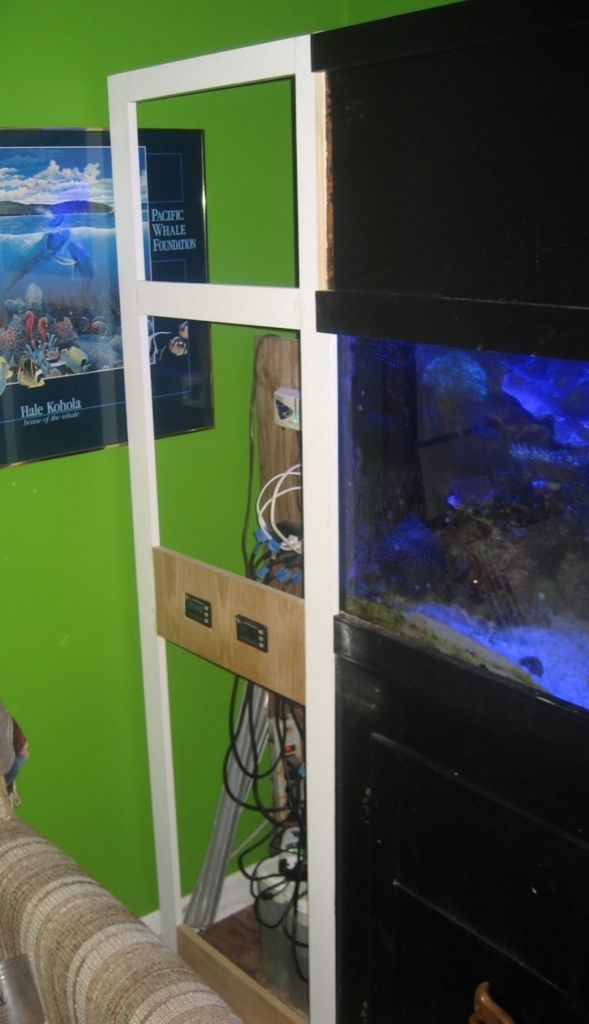
Now, should I start building the box, or the doors? I'm afraid if I build the doors first, I'll call it done....it does cover the mess!

Now, should I start building the box, or the doors? I'm afraid if I build the doors first, I'll call it done....it does cover the mess!
Two MP40 Wetsides Died - One New MP40 Wetside Arrived!
I ended up loosing two MP40 wetsides by the magnet's plastic case being compromised....and bleach accelerating the oxidation of the magnet, causing it to swell. I documented that HERE. I did order one new wetside and.......Woooo Hoooo! My new wetside is here!
This new MP40 wetside is totally different than the older MP40, and is in fact just like the MP10 wetside.
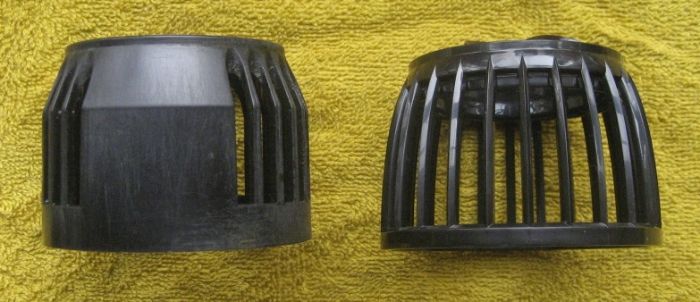
Here are the guts of the older MP40 wetside....note every piece comes apart to an individual piece:
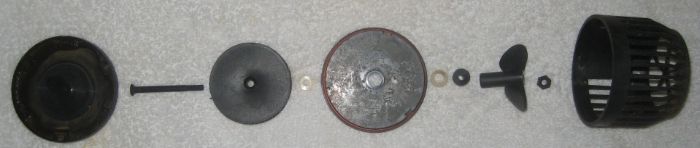
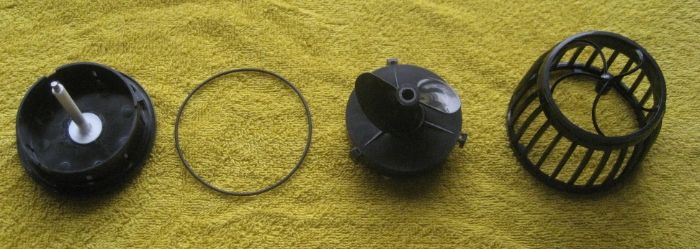
Here is the new MP40 wetside, where the impeller, plate and magnet are one (just like the MP10):
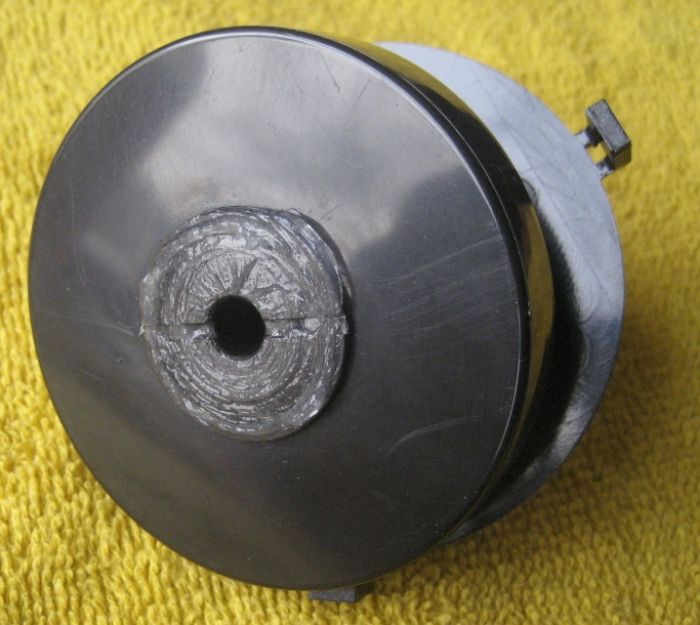
I was actually quite surprised to see grease used on the shaft.....and quite a bit of grease at that. When I first opened the box just after arriving, the impeller was very difficult to spin, with considerable amount of drag. After disassembling and seeing the grease, I'm pretty sure it was from the increased viscosity of the grease from sitting in cold trucks the last 3-4 days.:
The other difference with this shaft is that the metal center shaft extends all the up to, and into the cage piece. The old style shaft ended before the cage with a nut on the bolt/shaft.
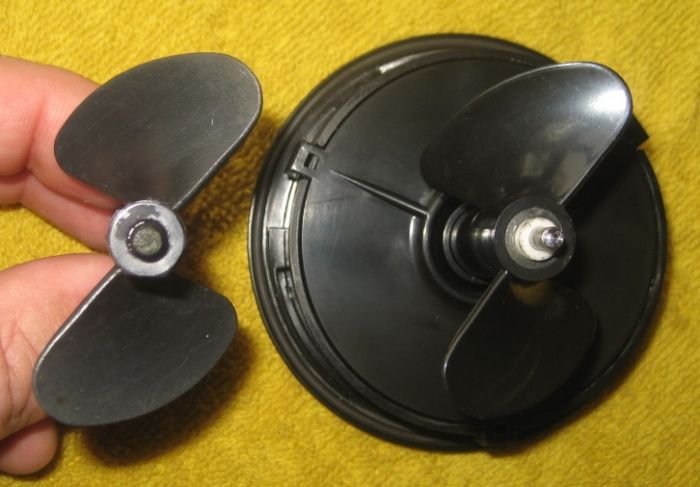
A closer comparison and it would appear that the impellers/propellers are the same size and shape:
The one difference noted in the general design was the lack of that blocked area on the cage with the newer model:
Now to put this little puppy in the tank and watch it spin. I'll also purchase a second after observing this one for a month or so. It spreads the pain a little better that way.
I ended up loosing two MP40 wetsides by the magnet's plastic case being compromised....and bleach accelerating the oxidation of the magnet, causing it to swell. I documented that HERE. I did order one new wetside and.......Woooo Hoooo! My new wetside is here!
This new MP40 wetside is totally different than the older MP40, and is in fact just like the MP10 wetside.
Here are the guts of the older MP40 wetside....note every piece comes apart to an individual piece:

Here is the new MP40 wetside, where the impeller, plate and magnet are one (just like the MP10):

I was actually quite surprised to see grease used on the shaft.....and quite a bit of grease at that. When I first opened the box just after arriving, the impeller was very difficult to spin, with considerable amount of drag. After disassembling and seeing the grease, I'm pretty sure it was from the increased viscosity of the grease from sitting in cold trucks the last 3-4 days.:

The other difference with this shaft is that the metal center shaft extends all the up to, and into the cage piece. The old style shaft ended before the cage with a nut on the bolt/shaft.
A closer comparison and it would appear that the impellers/propellers are the same size and shape:

The one difference noted in the general design was the lack of that blocked area on the cage with the newer model:

Now to put this little puppy in the tank and watch it spin. I'll also purchase a second after observing this one for a month or so. It spreads the pain a little better that way.
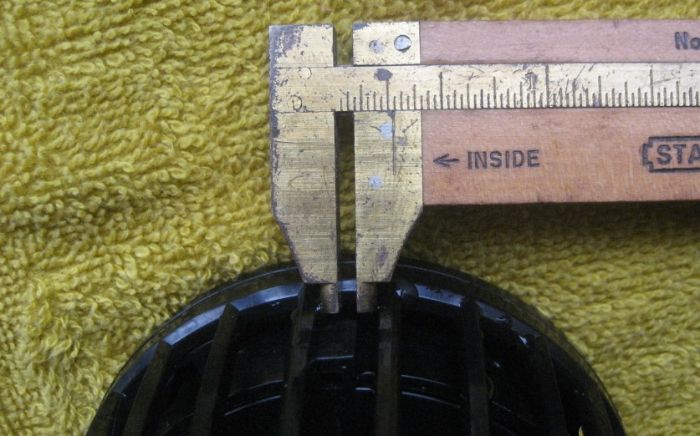
Wow John, you and those micrometer eyes.....good catch. Yes, there is a difference. First off, the new model has 24 slot openings around the entire cage while the old model has 25 openings, and that is with 1 7/8 inches blocked up. I was too lazy to break out my machinest calipers, but using my woodworker's calipers, here's want I found. The old slots had some variability, but most were 7/32's wide. The new one had slots that were more consistant and were all 9/32's.
New Cage:
New Cage:

Last edited:
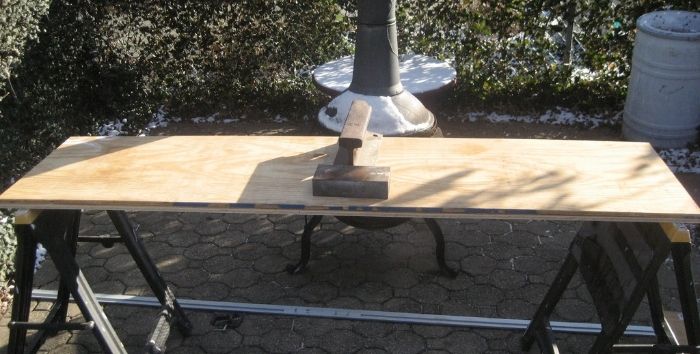
Finally have gotten back to working on the equipment cabinet. The first issue I ran into were the boards I had cut years ago that were now warped/bowed.
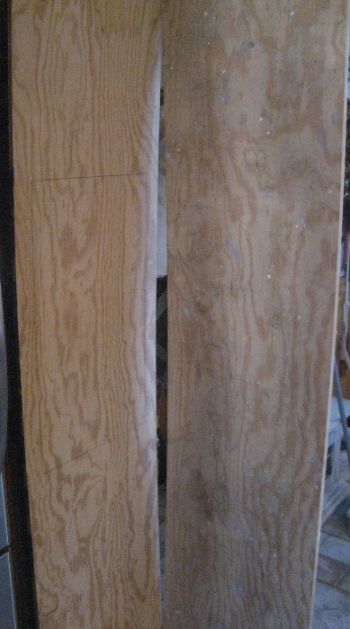
So I've had these two warped boards set up between two sawhorses for 2-3 days with 45 pounds of weight on them (a 27 lb piece of railroad rail, and an 18 lb solid steel brick). I don't think this did anything. They still appear to be the same as they were before the weights.
While the boards were sitting with the weight on them, I measured and cut the wood for the doors. They will be simple flat paneled doors, matching the stand. Also drilled pocket holes to assemble when ready. Just love that Kreg! The biggest issue with this wood was those labels they put on the wood......what a PIA to take those off. First a knife, with careful scrapping, and then isopropyl alcohol to remove the last bit of adhesive. You can actually see where the alcohol took the primer off the wood, in the picture below.
Here are the door pieces simply laid out on the floor.
After 3 or so days of the cabinet sides sitting with the weights, and no noticable straightening of the boards, I decided to put this thing together. Well it was a pain putting this thing together. I started with the plywood corner, were I had to use clamps to force out the warp, while it was glued and nailed. With the face frame, I cut a dado (grove) to accept the plywood, and help straighten it out at that joint. Also cut shelves out of 3/4 plywood....actually 23/32. Didn't notice when I purchase this piece of plywood....just this week....but it too was slightly cupped. Are they just not making quality wood any more? Although I shouldn't complain....it is construction grade, and not furniture grade,where I'd have to mortgage my house to buy a full sheet of that.
So finally, here is the carcass of the equipment cabinet!

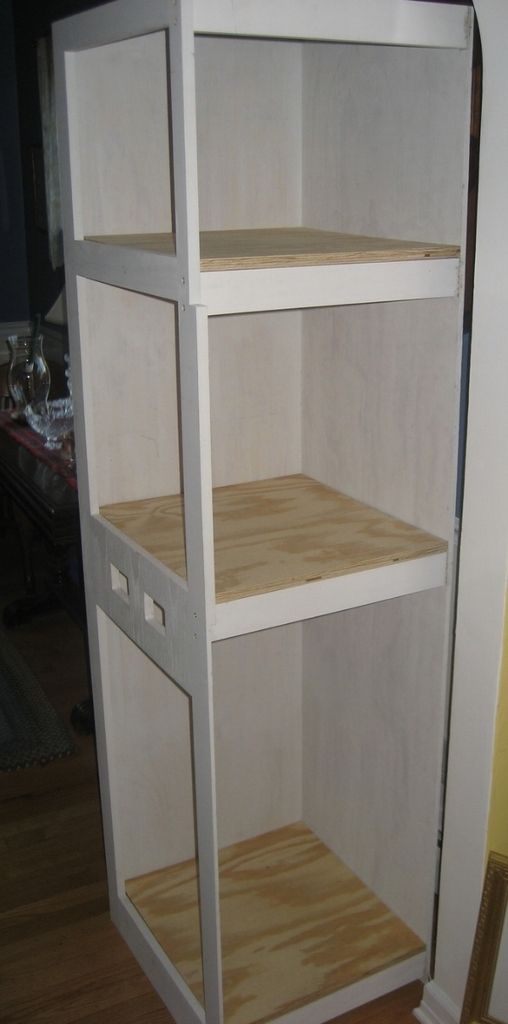
This open side will be up against the open portion of the side of the stand and the side of the tank....so no need for a solid side of the cabinet.

So I've had these two warped boards set up between two sawhorses for 2-3 days with 45 pounds of weight on them (a 27 lb piece of railroad rail, and an 18 lb solid steel brick). I don't think this did anything. They still appear to be the same as they were before the weights.

While the boards were sitting with the weight on them, I measured and cut the wood for the doors. They will be simple flat paneled doors, matching the stand. Also drilled pocket holes to assemble when ready. Just love that Kreg! The biggest issue with this wood was those labels they put on the wood......what a PIA to take those off. First a knife, with careful scrapping, and then isopropyl alcohol to remove the last bit of adhesive. You can actually see where the alcohol took the primer off the wood, in the picture below.
Here are the door pieces simply laid out on the floor.

After 3 or so days of the cabinet sides sitting with the weights, and no noticable straightening of the boards, I decided to put this thing together. Well it was a pain putting this thing together. I started with the plywood corner, were I had to use clamps to force out the warp, while it was glued and nailed. With the face frame, I cut a dado (grove) to accept the plywood, and help straighten it out at that joint. Also cut shelves out of 3/4 plywood....actually 23/32. Didn't notice when I purchase this piece of plywood....just this week....but it too was slightly cupped. Are they just not making quality wood any more? Although I shouldn't complain....it is construction grade, and not furniture grade,where I'd have to mortgage my house to buy a full sheet of that.
So finally, here is the carcass of the equipment cabinet!


This open side will be up against the open portion of the side of the stand and the side of the tank....so no need for a solid side of the cabinet.
Come on Pete....you're here lurking......at least set up a small one!
awesome work Paul!!