

-
Folks, if you've recently upgraded or renewed your annual club membership but it's still not active, please reach out to the BOD or a moderator. The PayPal system has a slight bug which it doesn't allow it to activate the account on it's own.
You are using an out of date browser. It may not display this or other websites correctly.
You should upgrade or use an alternative browser.
You should upgrade or use an alternative browser.
Inherited 90
- Thread starter redfishbluefish
- Start date
Thanks for the kind words everyone. Now here's more as this thing comes together.
THE BELLY OF THE BEAST
This thing evolves as I go forward with the various parts of this cabinet. I originally planned on simply putting a piece of plywood across the bottom of that wide center style to hold and hide all the wires coming in from the stand. But as I gave this thought, the 2x6 side of the stand is the same width and I would therefore have to cut a hole in the bottom of this "floor" to pass wires in and out. I though it would be a bit too difficult pulling wires in and out to do equipment cleaning and replacing.
So I came up with what I call the belly of the beast. I will drop the "floor" down a couple inches, now leaving the stand side slightly open to allow easy feeding of wires in and out of the cabinet. I think this will become a bit clearer with pictures.
I first made the two side supports:

The one on the stand side (that's free standing) was cut from one piece of wood, but the other side (screwed to the side plywood), was made of three parts glued together.
Here is the one solid side one simply friction fitted in place.

The support pieces were glued and screwed in place. A 1/4 inch plywood "floor" was applied using glue and nails....and all coated with Kilz.
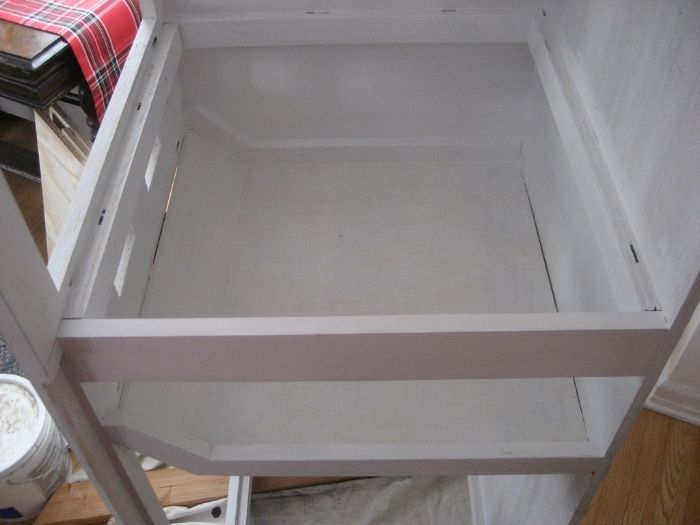
That drop-down allows for wires to go in and out of the cabinet with ease....hopefully. And this belly keeps the birdnest of wires hidden.
I like how this came out.....just hope it works out.
THE BELLY OF THE BEAST
This thing evolves as I go forward with the various parts of this cabinet. I originally planned on simply putting a piece of plywood across the bottom of that wide center style to hold and hide all the wires coming in from the stand. But as I gave this thought, the 2x6 side of the stand is the same width and I would therefore have to cut a hole in the bottom of this "floor" to pass wires in and out. I though it would be a bit too difficult pulling wires in and out to do equipment cleaning and replacing.
So I came up with what I call the belly of the beast. I will drop the "floor" down a couple inches, now leaving the stand side slightly open to allow easy feeding of wires in and out of the cabinet. I think this will become a bit clearer with pictures.
I first made the two side supports:

The one on the stand side (that's free standing) was cut from one piece of wood, but the other side (screwed to the side plywood), was made of three parts glued together.
Here is the one solid side one simply friction fitted in place.

The support pieces were glued and screwed in place. A 1/4 inch plywood "floor" was applied using glue and nails....and all coated with Kilz.
That drop-down allows for wires to go in and out of the cabinet with ease....hopefully. And this belly keeps the birdnest of wires hidden.
I like how this came out.....just hope it works out.
Thanks @BuGG !
Dosing Pump Stand-Offs and Container Holder
Well, my wife had a "snow day" today, being a teacher and now having the day off. That meant that I couldn't do my daily routine of playing with the tank and doodling in my shop. So I had to sneak down there to get a couple thinks done......like building these stand-offs.
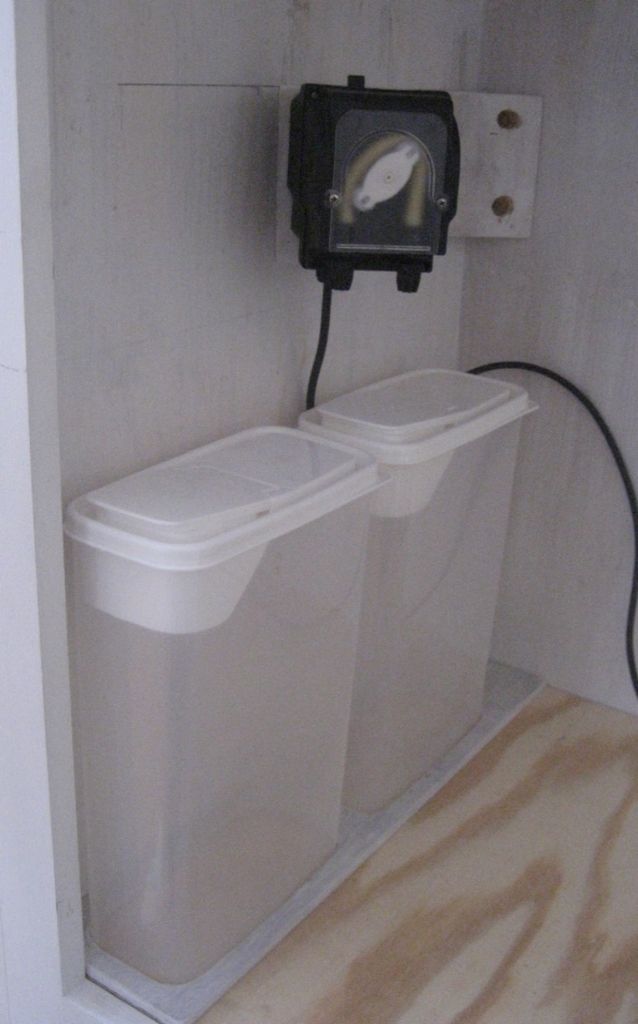
In retrospect, not sure why I built these little stand-offs with three little boards each. I could have easily taken a piece of 3 by, and angle cut at 45 degrees and be done. I will admit that is was fun calculating all the sizes of the pieces. My wife actually thought I was doing something very important, with all the math. The stand-offs will hold the BRS dosing pumps at 45 degrees, while the piece of plywood with the holes will hold the alkalinity and calcium containers in their place:
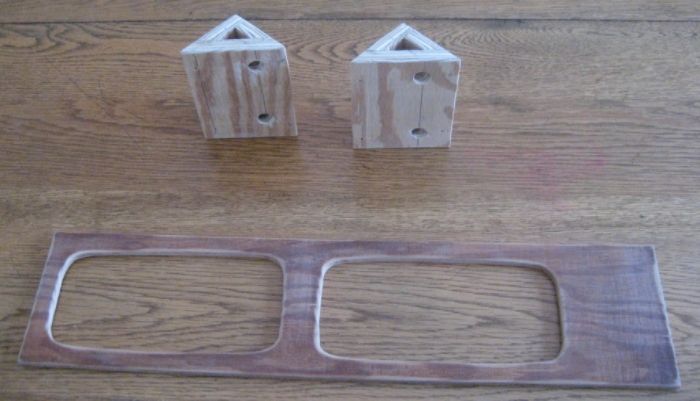
Here are the two stand-offs installed, with one pump install.....hopefully this gives you a better idea of what I'm talking about. The 1/4 plywood base simply holds the Alk and Calc containers in place.
She's off to a baby shower tomorrow, so it should be a good day.
Dosing Pump Stand-Offs and Container Holder
Well, my wife had a "snow day" today, being a teacher and now having the day off. That meant that I couldn't do my daily routine of playing with the tank and doodling in my shop. So I had to sneak down there to get a couple thinks done......like building these stand-offs.
In retrospect, not sure why I built these little stand-offs with three little boards each. I could have easily taken a piece of 3 by, and angle cut at 45 degrees and be done. I will admit that is was fun calculating all the sizes of the pieces. My wife actually thought I was doing something very important, with all the math. The stand-offs will hold the BRS dosing pumps at 45 degrees, while the piece of plywood with the holes will hold the alkalinity and calcium containers in their place:
Here are the two stand-offs installed, with one pump install.....hopefully this gives you a better idea of what I'm talking about. The 1/4 plywood base simply holds the Alk and Calc containers in place.
She's off to a baby shower tomorrow, so it should be a good day.
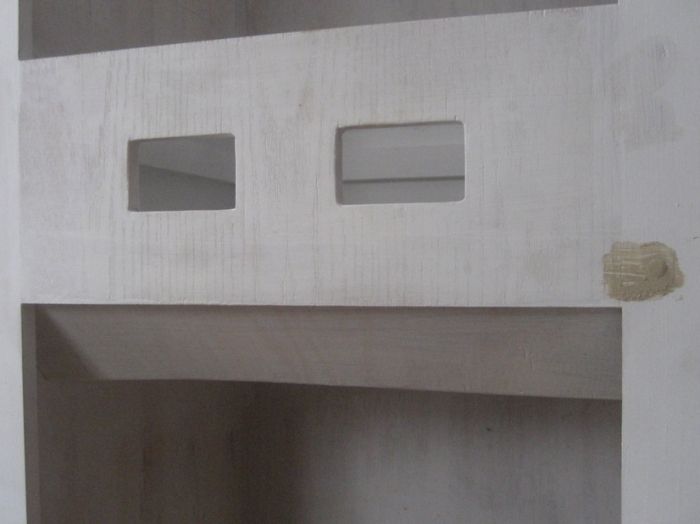
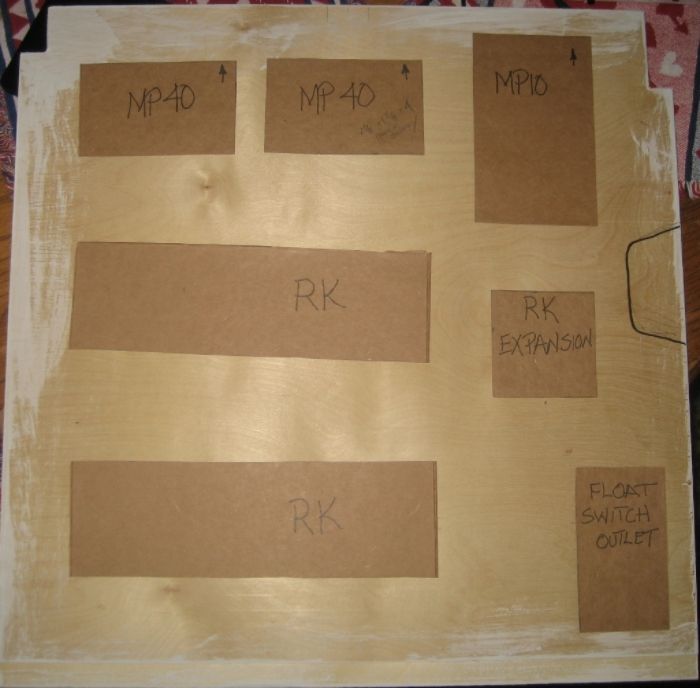
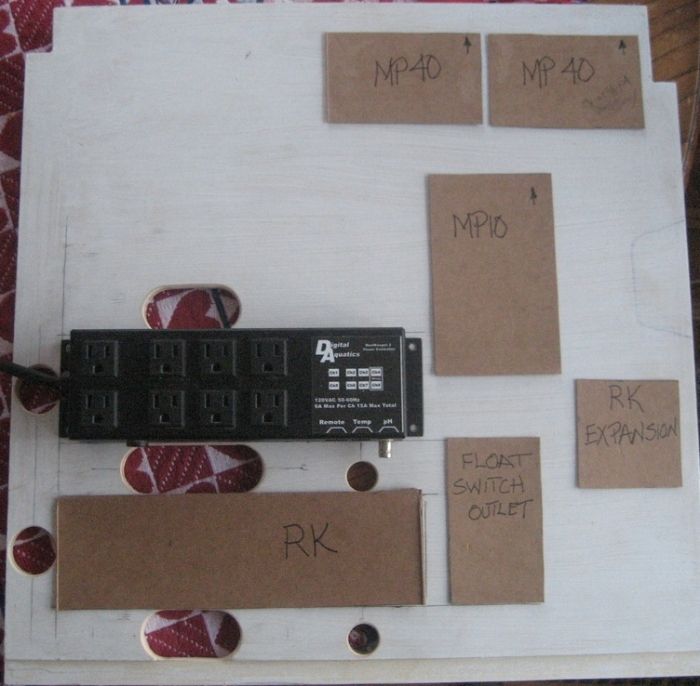
While I was searching for 1/4 plywood for the doors, I found a nice piece of 5/8 furniture grade plywood that I decided to use for the equipment boards. These were rough cut out and I also made cutouts of the equipment to play with placement.
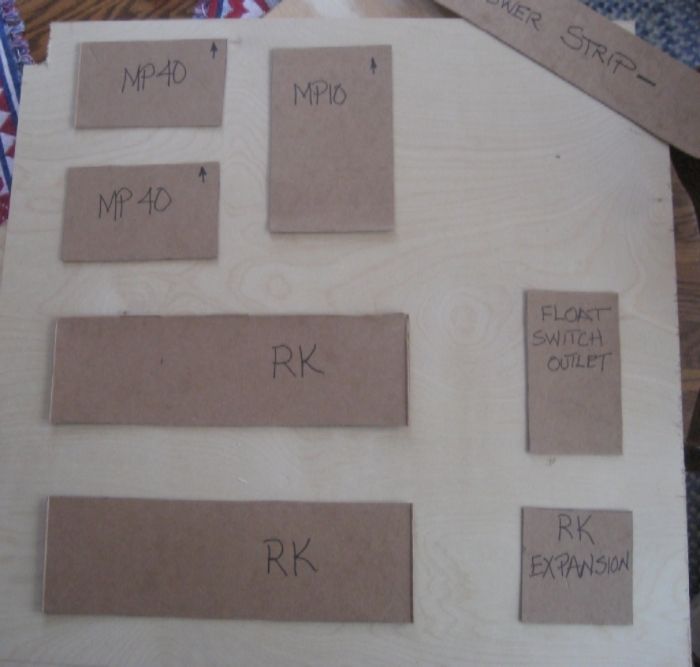
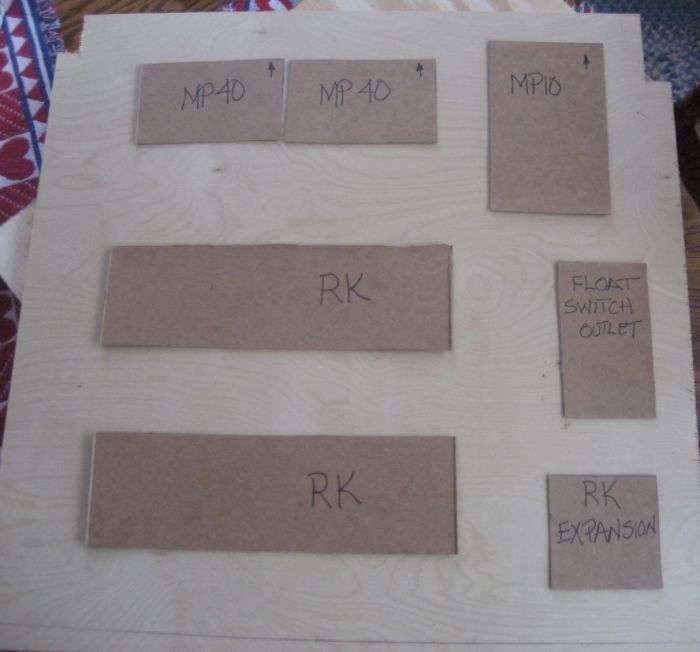
I'm pretty sure I'll mount the power strip in the lower part of the cabinet. Of the two above, I liked the second one better. So I mounted these partition boards in the cabinet. Now the double Doh! I was sitting back admiring my work (every once in a while I pat myself on the back), and it hit me! The dry side of the MP40 will stick into the stand....right where this equipment is located.......Doh! Here is the approximate location of the dry side up against that board:
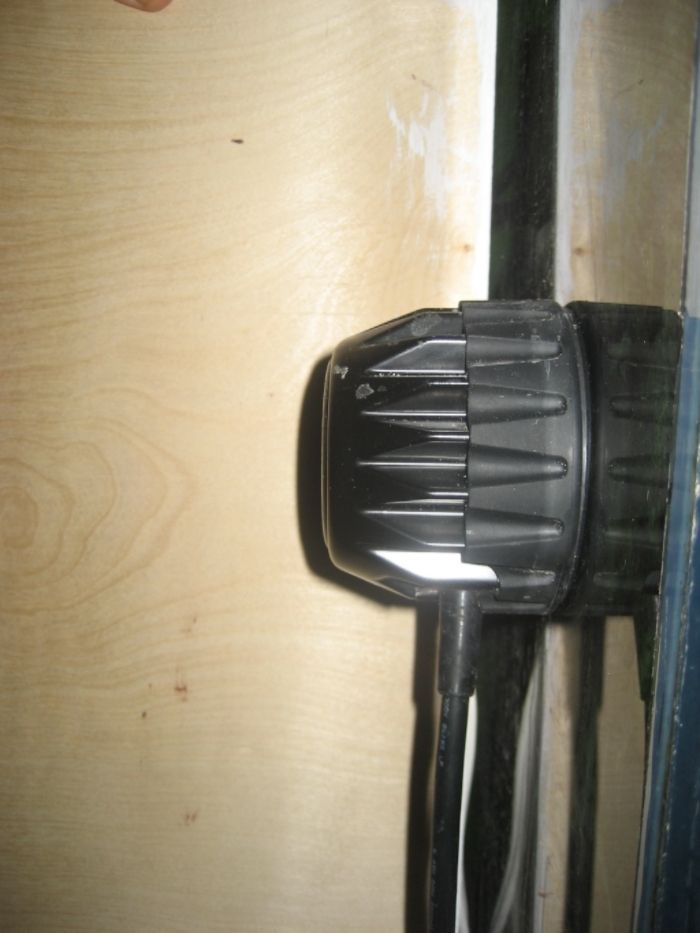
Now, while looking at this protrusion, I look up at the canopy, and now double Doh! The fan is sticking out into the partition board of the upper part of the cabinet. Totally forgot about that as well:
WIth the fan, I'll simply take that out. It died awhile ago and I don't use it anymore having LEDs....so no biggie. With the dry side of the MP40, I'll just rework the layout of the equipment. Here is the equipment board again, with the dry side shown with a Sharpie.
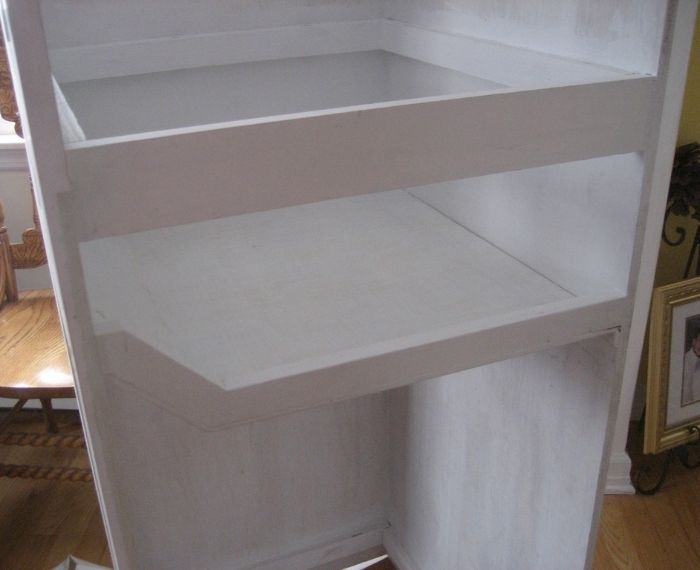
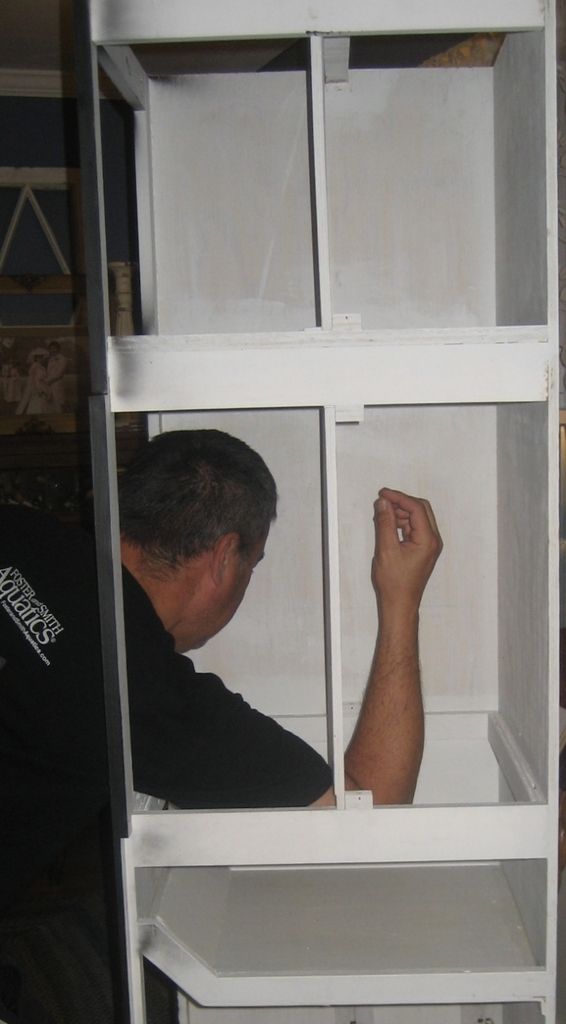
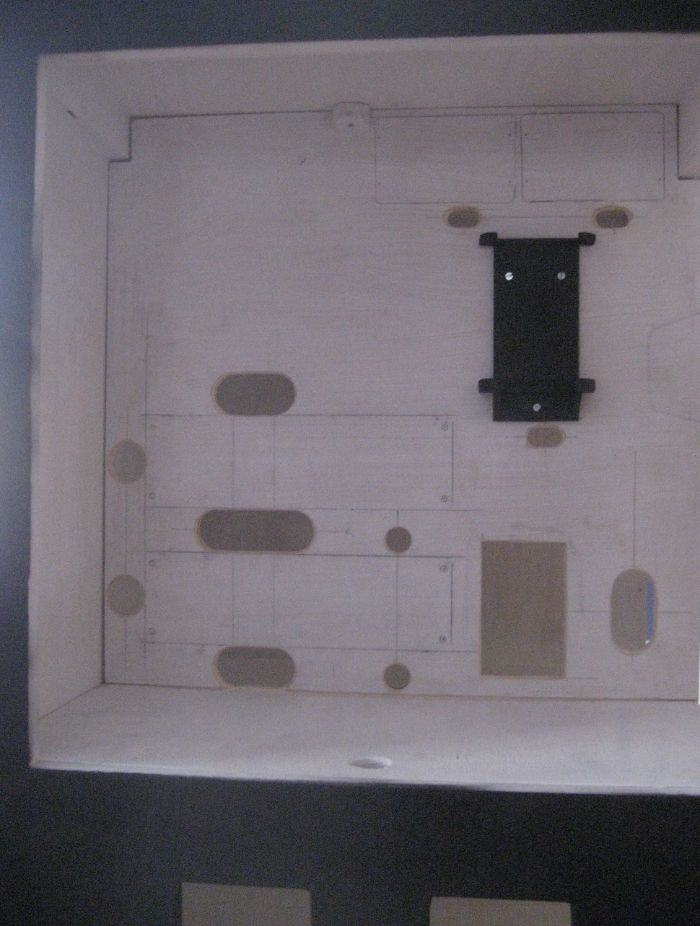
With the false walls installed using small cleats, here's what the cabinet looks like.
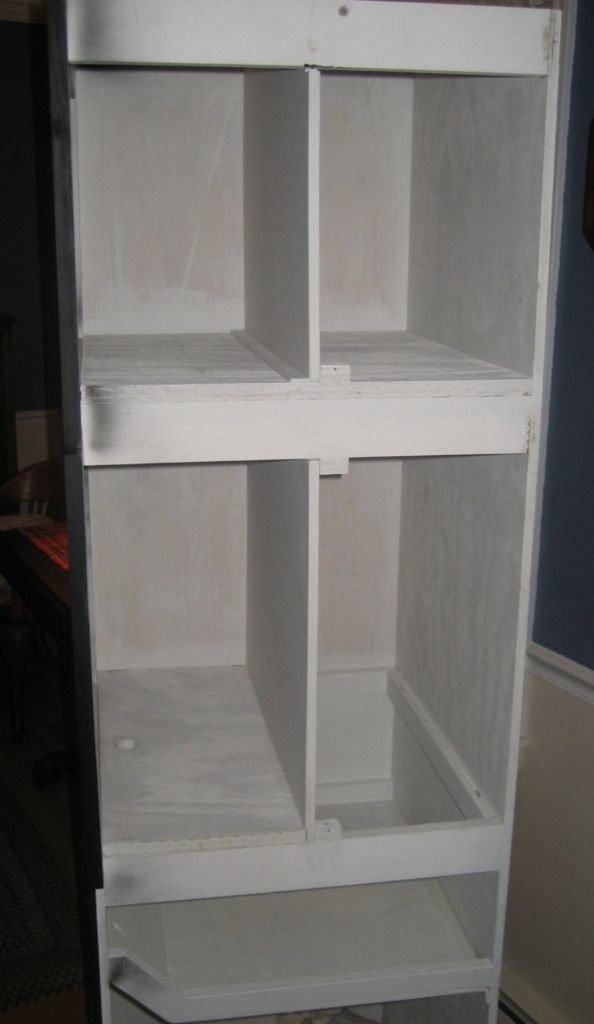
The middle section shelf is not screwed in and can be removed by simply lifting it out....just friction fit. Either one of these false walls are held in place with a single screw, so if they do need to be removed, it's quick and easy. However, I don't believe I'll need to remove the middle false wall because I can easily get my arm/hand to the back side to feed wires in and out.
Between the Belly of the Beast and the space behind these false walls, I'll be able to hide a crap-load of wires. From the front side it should look clean and organized.
Now, for some reason, as I approach the completion of this cabinet, I've become very tentative in doing the actual drilling and placement of equipment on this board. I don't know why I feel this way. If it doesn't work out I could always simply cut another board....but still I've got this nervousness going forward. I actually haven't drilled any holes in this cabinet yet....and it will need quite a few. I wonder what that's all about.
I'm pretty sure I'll mount the power strip in the lower part of the cabinet. Of the two above, I liked the second one better. So I mounted these partition boards in the cabinet. Now the double Doh! I was sitting back admiring my work (every once in a while I pat myself on the back), and it hit me! The dry side of the MP40 will stick into the stand....right where this equipment is located.......Doh! Here is the approximate location of the dry side up against that board:
Now, while looking at this protrusion, I look up at the canopy, and now double Doh! The fan is sticking out into the partition board of the upper part of the cabinet. Totally forgot about that as well:
WIth the fan, I'll simply take that out. It died awhile ago and I don't use it anymore having LEDs....so no biggie. With the dry side of the MP40, I'll just rework the layout of the equipment. Here is the equipment board again, with the dry side shown with a Sharpie.
With the false walls installed using small cleats, here's what the cabinet looks like.
The middle section shelf is not screwed in and can be removed by simply lifting it out....just friction fit. Either one of these false walls are held in place with a single screw, so if they do need to be removed, it's quick and easy. However, I don't believe I'll need to remove the middle false wall because I can easily get my arm/hand to the back side to feed wires in and out.
Between the Belly of the Beast and the space behind these false walls, I'll be able to hide a crap-load of wires. From the front side it should look clean and organized.
Now, for some reason, as I approach the completion of this cabinet, I've become very tentative in doing the actual drilling and placement of equipment on this board. I don't know why I feel this way. If it doesn't work out I could always simply cut another board....but still I've got this nervousness going forward. I actually haven't drilled any holes in this cabinet yet....and it will need quite a few. I wonder what that's all about.
Well, change of heart on the upper cabinet portion, which was going to have all the light outlets. What I originally planned in my head was to install three, 4 gang outlets on that false wall and have holes were the plugs could come through to plug into the respective outlets. I'm talking about three of these:
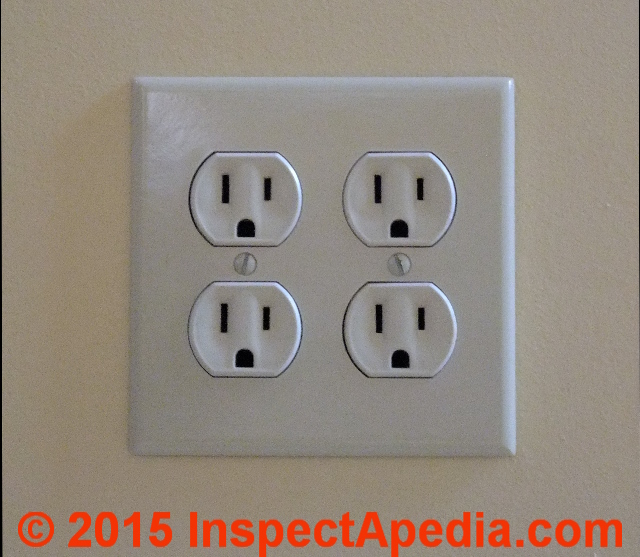
There would be one outlet for "whites", one outlet for "blues", and one outlet for "moon lights" With each of these I have three wires to plug in...for a total of nine wires.
So here's my issue.....the one wire coming from the furthest fixture just makes it into the top of the cabinet. If I were to do this outlet thing, I'd have to get one of those 1 foot extension cords to reach...no big deal, but I didn't like it. One or two of the other wires would have been close as well, and might also needed an extension. I felt it would still look messy.
So here's what I did instead .........I ordered up three power strip outlets from Amazon.

With Prime, these should be here toot-sweet.
I will install these either on the back wall, or put up a piece of plywood to the right.....but behind the false wall. These power strips should be close enough so no extension cords will be needed. I still plan on using this false wall to hide it all. Again, a single screw exposes the back side.
There would be one outlet for "whites", one outlet for "blues", and one outlet for "moon lights" With each of these I have three wires to plug in...for a total of nine wires.
So here's my issue.....the one wire coming from the furthest fixture just makes it into the top of the cabinet. If I were to do this outlet thing, I'd have to get one of those 1 foot extension cords to reach...no big deal, but I didn't like it. One or two of the other wires would have been close as well, and might also needed an extension. I felt it would still look messy.
So here's what I did instead .........I ordered up three power strip outlets from Amazon.
With Prime, these should be here toot-sweet.
I will install these either on the back wall, or put up a piece of plywood to the right.....but behind the false wall. These power strips should be close enough so no extension cords will be needed. I still plan on using this false wall to hide it all. Again, a single screw exposes the back side.
Thanks Kevin. I'm also getting antsy, wanting to get this thing done. What I'm working on today is drilling holes and reviewing what needs to be done to smoothly do the transfer. I'm trying to avoid any more "Doh's!" when the transfer goes down. The one thing I just realized is the cable for the MP40 coming from the far side of the tank....how am I getting it into the cabinet (not so much an issue...another hole), but also, how do I actually string it into the cabinet without being able to get behind the tank/cabinet.
Also making a trip to Lowes to get stainless screws. Although I know it's overkill (currently have had standard steel screws without issue), I want to use stainless on all the equipment hold-downs.
Also making a trip to Lowes to get stainless screws. Although I know it's overkill (currently have had standard steel screws without issue), I want to use stainless on all the equipment hold-downs.
Atman Down Right Stinks!
Got up today, excited that this cabinet is close to being finished. Power strips have been shipped, and should be here tomorrow. Started measuring and laying out all the holes I need to drill, when I go into the fish room to see the lights aren't ON. What the hoot! And, the one ReefKeeper controller is not lit up. I did notice an electrical smell as well.
I'm figuring I blew the fuse in the PC8 and no big problem, I have a backup PC8. I pull all the plugs on the old one and start to plug the new one in. As soon as I plugged in plug #6, boom, the fuse blows in this PC8, and lights out on the controller (as well as the tank's lights, which were on plugs 2 - 4). So I actually unscrew the old PC8 from the board and bring it out to the dining room table, thinking I could easily replace the fuse. When I go to take the fuse out, there is this black liquid around the fuse screw.

When I go to wipe off this apparent black goo, it actually is a dark purple on the tissue. What the heck is this stuff? When I open the fuse, none of this inky stuff is in there. So I then open up the whole PC8, like I know what I'm looking at. (I don't know electronics, period). I find that this is as far as I could go:
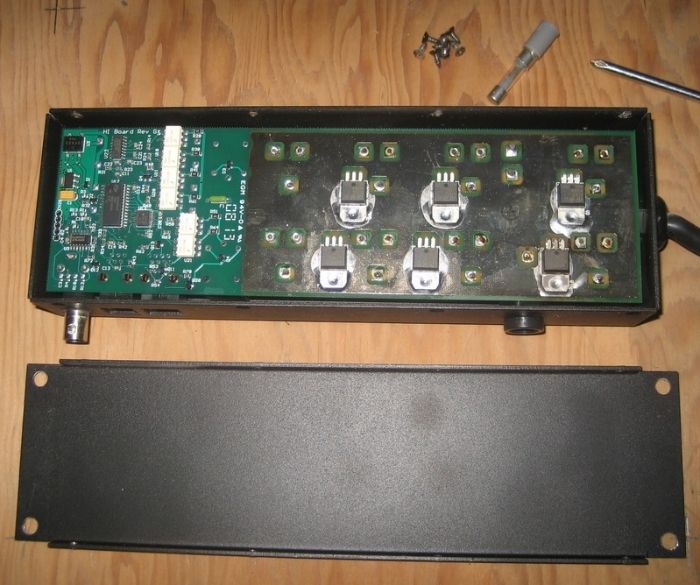
Nothing obvious, and only a very slight amount of this ink close to the plug location #6.....close to the fuse. No time to see if this PC8 is still good....back to finding out what was going on.
So I replace the fuse in the "newer," non-inky PC8 and go back to the tank and plug in everything except plug #6. Now what is Plug #6? It is the power to the float switch cut-out, that has both the skimmer and Biopellet reactor plugged into it. This cut-out is for the float switch in the skimmate container. If this container is too full with skimmate, it cuts the skimmer (and biopellet reactor), and saves me from a flood.
I quickly found that of the two, it was the marvously designed Atman pump on my SWC 160 skimmer. Now I'm a back up freak. I have backups of pretty much everything. When I purchased this skimmer, I was aware that Atmans were below crap when it came to pumps, and accordingly, I had three additional pumps....for a total of four pumps. FOUR!!! Well I went through one......two.....three (which was brand new and never worked from day 1, !!!), and now four. Pump four just went in a couple months ago, and I figured I had a little time to order up additional replacements. Well, see where that got me.
When I pulled the skimmer apart to pull the pump out, that smell was so strong, I had to put the pump out the back door. I also needed to clean the skimmer body with a little soap and water to get rid of the smell. Actually a lot of soap....had to soak the parts to get rid of the smell. I'm running carbon in the tank as well, not knowing if whatever this is, is it in the tank. It's now a good number of hours after I discovered this, and that smell still lingers in the fish room. Good news is that polyps are out and fish appear to be fine.
Immediately ordered another Piece-O-Crap Atman 2500 from Amazon Prime. Should be here on Thursday. Hoping I'm OK without a skimmer until then. I do really like this skimmer and wished there was another pump option other then the Atman. SWC won't do anything because they are virtually out of business. Maybe I should be looking to pick up some other brand of skimmer.
Lets see what tomorrow brings!
Sorry to hear this Paul. I had the same experience with atman. With all your diy skill I am sure you can mate another pump to that skimmer.
Maybe look into the rock series pumps. It is the at an replacement and appear to be much better built.
Maybe look into the rock series pumps. It is the at an replacement and appear to be much better built.
Thanks for the info, but I'm not familiar with rock series pumps......do you have a link? I'm now thinking if I can't find a replacement pump for this Atman, I'm going to start looking for yet another skimmer.
This morning I still had a lingering odor of whatever came out of that blown Atman pump. I actually could smell the smell in the skimmate container and pulled that out and cleaned it. From this info, I would speculate the pump ran for some amount of time while it was dying, putting it's stink into the skimmate. Well everything is clean, awaiting the arrival of Atman pump #5. I'm also casually looking for another brand of skimmer to replace this SWC 160. Apparantly there is no replacement pump for this Atman that will fit in an SWC.
Anyway, today is about:
Holes!
So today was about making holes and filling holes.
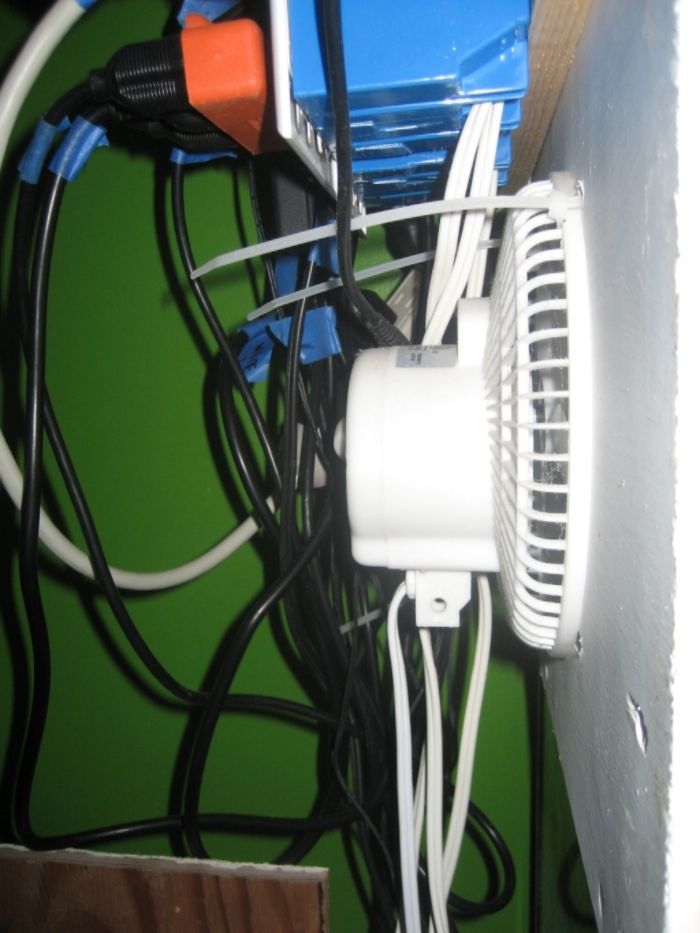
I actual began with blocking the hole in the canopy that held the fan. The fan would be in the way of the cabinet, and the partition wall in that part of the cabinet. I pointed this out in post #54, above. Simple fix....I cut a piece of 1/4 plywood that would cover the hole...keeping fish from making the jump through that hole. But not so fast. I did cut the plywood and had it drilled to screw it in place. However, when I pulled out the fan (that was no longer working), I noticed the front screen easily pops off.
") So instead of having a blocked off hole, I now have a passive ventilation hole covered by the screen of the fan (and the screen will keep fish from surfing.) A serendipitous fix, if I say so myself. I think I had a little smile on my face for the next half hour or so, really liking this fix.
So instead of having a blocked off hole, I now have a passive ventilation hole covered by the screen of the fan (and the screen will keep fish from surfing.) A serendipitous fix, if I say so myself. I think I had a little smile on my face for the next half hour or so, really liking this fix.Inside the Canopy:

Outside the Canopy:

Now to making holes!
I have a wall outlet behind where this cabinet is going. Using the largest hole saw I have (3 1/2 inches), I drilled a hole where this outlet should be once the cabinet is installed. I did measure twice.

Now with the equipment board, I was nervous about starting to drill this. I'm not sure why, but after a couple holes, I seemed to calm down. I started with the two ReefKeeper Power Controllers. I did tighten these up from the original plan (got them closer). Once these holes were done, I made yet another change to the layout. I remembered that the one MP40 on the far side of the tank, the wire just gets to this side. So I moved the controllers closer to the right wall of the cabinet, were that wire would be coming into the cabinet. Here's the new layout.

So next I cut the holes for the two MP40 controllers. This is were I hit my third Doh! of this build. (Luckily an easily fixed Doh!) The cleat that holds this board in place is right where the controller will be located. DOH!!!

Simply moved the cleat over about 1 1/2 inches.....done!

And finally, here is the equipment panel all drilled out and in the cabinet, along with the MP10 mounting bracket I made. (If interested in the mounting bracket, I did a discuss the DIY in thread #399 above.)

I'm going to slap a second coat of paint on this and call this part of the cabinet DONE!
Darn, I'm getting close!
This is what bubble magus uses now instead of the atman. http://www.saltycritter.com/pumps/bubble-magus-rock-sp-needlewheel-pumps.htm
that looks sharp...Thanks for the info, but I'm not familiar with rock series pumps......do you have a link? I'm now thinking if I can't find a replacement pump for this Atman, I'm going to start looking for yet another skimmer.
This morning I still had a lingering odor of whatever came out of that blown Atman pump. I actually could smell the smell in the skimmate container and pulled that out and cleaned it. From this info, I would speculate the pump ran for some amount of time while it was dying, putting it's stink into the skimmate. Well everything is clean, awaiting the arrival of Atman pump #5. I'm also casually looking for another brand of skimmer to replace this SWC 160. Apparantly there is no replacement pump for this Atman that will fit in an SWC.
Anyway, today is about:
Holes!
So today was about making holes and filling holes.
I actual began with blocking the hole in the canopy that held the fan. The fan would be in the way of the cabinet, and the partition wall in that part of the cabinet. I pointed this out in post #54, above. Simple fix....I cut a piece of 1/4 plywood that would cover the hole...keeping fish from making the jump through that hole. But not so fast. I did cut the plywood and had it drilled to screw it in place. However, when I pulled out the fan (that was no longer working), I noticed the front screen easily pops off.
Inside the Canopy:

Outside the Canopy:

Now to making holes!
I have a wall outlet behind where this cabinet is going. Using the largest hole saw I have (3 1/2 inches), I drilled a hole where this outlet should be once the cabinet is installed. I did measure twice.

Now with the equipment board, I was nervous about starting to drill this. I'm not sure why, but after a couple holes, I seemed to calm down. I started with the two ReefKeeper Power Controllers. I did tighten these up from the original plan (got them closer). Once these holes were done, I made yet another change to the layout. I remembered that the one MP40 on the far side of the tank, the wire just gets to this side. So I moved the controllers closer to the right wall of the cabinet, were that wire would be coming into the cabinet. Here's the new layout.
So next I cut the holes for the two MP40 controllers. This is were I hit my third Doh! of this build. (Luckily an easily fixed Doh!) The cleat that holds this board in place is right where the controller will be located. DOH!!!

Simply moved the cleat over about 1 1/2 inches.....done!

And finally, here is the equipment panel all drilled out and in the cabinet, along with the MP10 mounting bracket I made. (If interested in the mounting bracket, I did a discuss the DIY in thread #399 above.)
I'm going to slap a second coat of paint on this and call this part of the cabinet DONE!
Darn, I'm getting close!
This is what bubble magus uses now instead of the atman. http://www.saltycritter.com/pumps/bubble-magus-rock-sp-needlewheel-pumps.htm
Thanks Joe for the heads up. However, the issue with these pumps is that Bubble Magnus had to redesign their bubble plates for these new replacement pumps to fit. Don't know if they still sell the "upgrade" kit, but it was pretty costly to do this upgrade when Via Aqua (actual manufacter of Atman pumps) suddenly went out of business. However, when Via Aqua went out of business, a couple months later, some other Chinese company started to make Atman's. By this time, Bubble Magus had already made the change. Of course, with SWC, they were swamped in legal issues, and are now virtually out of business.....so you won't see any changes coming from them. I like the skimmer design, it's just the pump that's a piece of crap. Just wished their was an easy replacement.
that looks sharp...
Thanks Marcus......more to come.....I can see the finish line!
The pump was the main reason I went with the SSA instead of the BM skimmer. The SSA is a BM skimmer, but with a better Sicce pump that is more readily available if the need arises...unlike the Atman.
So let me do an inventory.....I have an MRC 1, MRC 2, MTC 250, SWC 120, and this SWC 160. What would Jesus say? Actually more important, what would my wife say to yet another skimmer? You wouldn't want to hear her answer.
Actually Jim, I'm trolling for the possibility of another skimmer....with a reliable pump. Five pumps are way too many.
Lights, Holes and the Final Paint
The power strips for the nine light plugs arrived last night, and so they were installed today. One strip for the "White" channel, one for the "Blue" channel, and one for the moon lights. The holder for the Vortech voltage supplies also installed in this upper part of the cabinet.

Also drilled maybe 6 or 7 more holes. I didn't count, put this cabinet now has a load of holes for the wires to go everywhere.

And finally, gave the inerts a second and final coat of paint. You'll also note the white outlet in the middle section.....since the skimmer was crapped out, I installed the outlet and relay for the float switch that is in the skimmate container......kills the skimmer pump if the container is too full.


Tomorrow is D Day....this thing is getting installed! In addition, the new skimmer pump should be here. Big day.
The power strips for the nine light plugs arrived last night, and so they were installed today. One strip for the "White" channel, one for the "Blue" channel, and one for the moon lights. The holder for the Vortech voltage supplies also installed in this upper part of the cabinet.

Also drilled maybe 6 or 7 more holes. I didn't count, put this cabinet now has a load of holes for the wires to go everywhere.

And finally, gave the inerts a second and final coat of paint. You'll also note the white outlet in the middle section.....since the skimmer was crapped out, I installed the outlet and relay for the float switch that is in the skimmate container......kills the skimmer pump if the container is too full.


Tomorrow is D Day....this thing is getting installed!
In addition, the new skimmer pump should be here. Big day.Thanks Kevin.....I had to temporarily trash the power supply holders.....read and you'll see.
Equipment Cabinet Installed
What a long day. I started at 7AM and didn't stop until around 10PM. The installation isn't finished, but I am! I just wished I had a Scotch to sip on while I type this.
Began the day by moving furniture and getting everything staged. Thought about those things I could disconnect and leave disconnected with minimal impact on the tank. So the first things I did were to plug all light fixtures into a power strip....directly into the wall, with now all lights ON. All these wires were moved to behind the canopy, out of the way where the cabinet was going.
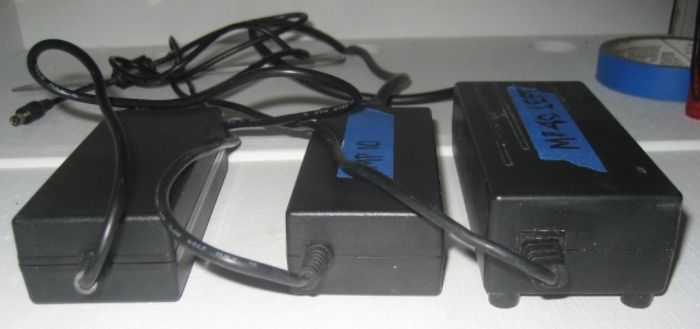
Next was the MP10 power supply and controller. This powerhead is in my sump, and that would be receiving enough flow from the return pump circulation, so not a problem pulling it. Here's where I hit my first glitch. I had planned the power supply holder I built on a spare MP40 unit I had. I just assumed an Ecotech power supply, is an Ecotech power supply, is an Ecotech power supply. Well, I was wrong, but at first I thought, "no big deal." The MP10 power supply had it's feed wire offset, while the design of the holder had all feed line holes perfectly centered.....just like the power supply from the MP40 spare. I figured an easy fix, I'll just drill another hole slightly off to the side....done. I went to check the MP40 power supplies, which wasn't an easy feat, considering they were buried in the wire mess behind the equipment wall. Anyway, I reached behind and pulled one out, and here's were I now had a bigger problem. Not only was the wire offset, they were considerably bigger. So Ecotech obviously sourced different power supplies over the years. So out came the nice little holder I made to house all the power supplies. Here are three different power supplies....the one on the left is what was used to build the holder (an MP40 power supply, circa 2009), the middle one is from my MP10, and the one on the right is the current MP40 power supplies.
The next to be disconnected were the dosing pumps and containers. The first pump doesn't dose until 1AM, so no problem removing these for the day. Then the upper Reefkeeper came out. The only thing still connected to this were the ATO system and the pump for the carbon/gfo. This RK was mounted into the new cabinet.
And finally the tank was shut down and the second Reefkeeper was pulled off, with a simple sendoff and farewell to the temporary equipment board. Good riddance!

I started a stopwatch because I wanted to know how long the tank would be shut down. The stand was slid into place at about 1:30-2:00PM.....a lot later than I ever would have guessed. It took 55 minutes for me to restore powerheads and return pump, and another 10 minutes to get the ReefKeeper Expansion outlet installed and heat back on. The tank had dropped 8/10 of a degree to 77.2F. Since function was restored, I now started from the top of the cabinet and worked down.
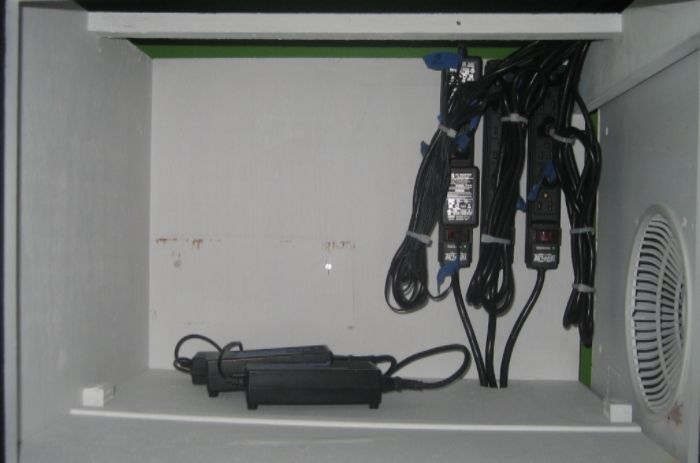
Light power strips installed, with the power supplies for the Vortechs (without the organizer.) I will be doing another organizer to accommodate the larger units.....that wasn't expected. This will all be unseen, all hidden behind a false wall.
Next was the middle section....the guts of the electronics. I pulled all remaining plugs over from the stand and plugged everything in were it belonged. I eventually want to label everything with the p-touch when I have a chance, to make it look pretty.
Two little glitches with this middle section. The wire for the MP40 needed a little cutout to get to the back side of the board. You can see the little hook shaped hole above. The second was the wire for the pH probe was rigid coming out of the connector....couldn't be bent....and hitting the shelf. This fix was to cut a grove in the shelf to accommondate the stiff wire. It's hard to see, but there is a grove there for the pH wire.

By the way, the Belly of the Beast turned out perfect. That drop-down space was enough to clear the support beam in the stand. This shot is taken in the stand of the open space for the wires to easily get into the cabinet.
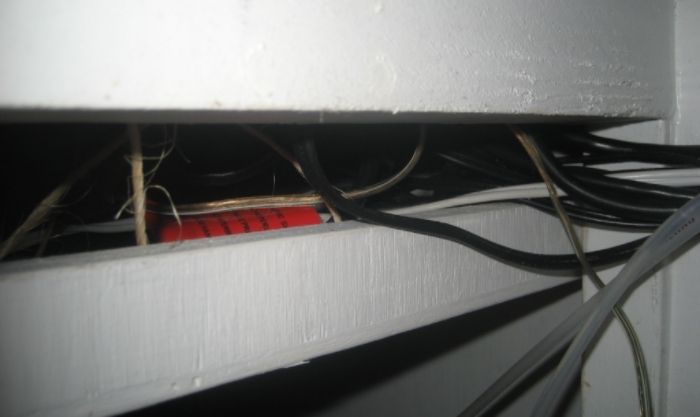
I will say that the wires in the Belly of the Beast are a mangled mess. I was hoping to have it well organized, but I was in a rush to get everything plugged in, and before you knew it, spaghetti. When I have time, I'd like to go back and straighten this up.
The bottom portion of the cabinet was easy.....dosing pumps and containers....done!

Amoungst all this caos, the UPS guy dropped off the Atman skimmer pump around 7PM. I got that put back together and found that the float switch/relay in the skimmate container wasn't working. I can only guess when the Atman shorted out, it fried the relay/float switch. I didn't want to chance a "new" skimmer with a skimmate container without the insurance of it turning off if it begins to puck. So I disconnected the container from the skimmer, and plugged off that tube. If it goes nuts, it will simply overflow the collection cup and go back into the sump. Not sure what I'll be doing about this relay/float switch thing....something for tomorrow.
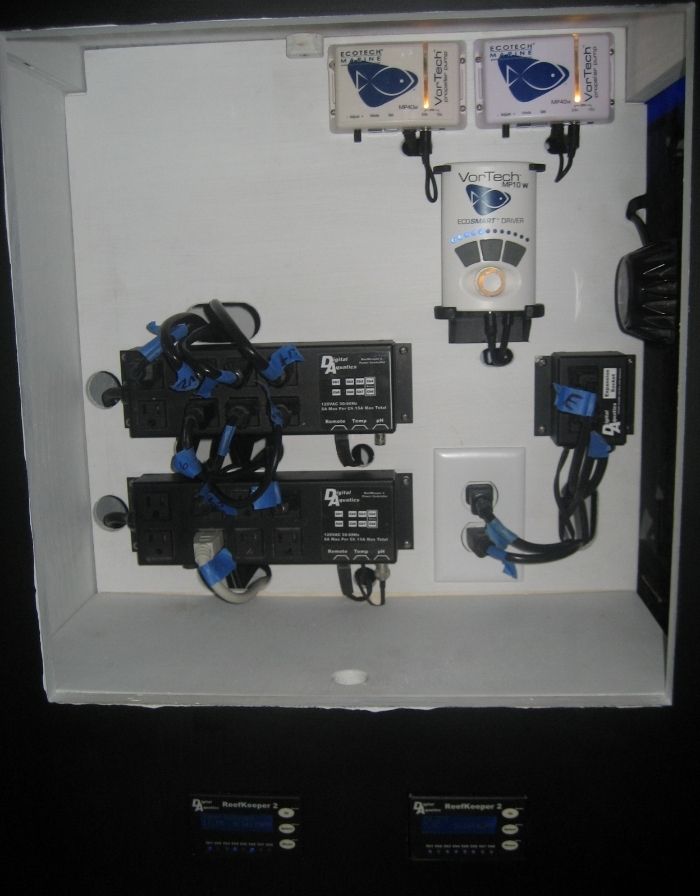
And finally, here's were I am right now with this cabinet:

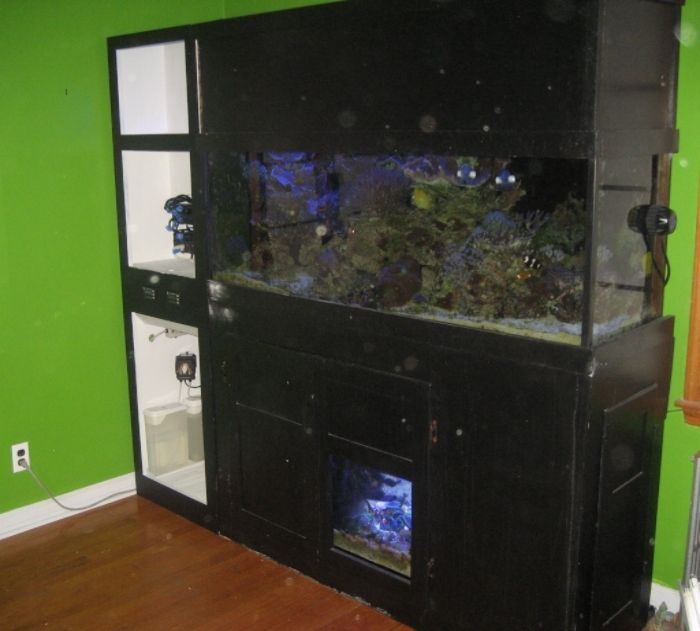
I'm still not finished. Need to do a little trim work and make the doors. WIth the false wall in the upper portion, and the light that shines through the fan cover from the canopy, I was thinking of putting a glass panel in that door frame. Got to give that additional thought. Or, maybe I can finally hang the now rusting plaque I recieved from MACNA that my wife never let me hang anywhere in the house. See'd never know it's behind that door! It's been collecting dust (and rust) in the fishroom closet since 2009.

I think I'm punch-drunk....I'm going to bed!
Equipment Cabinet Installed
What a long day. I started at 7AM and didn't stop until around 10PM. The installation isn't finished, but I am! I just wished I had a Scotch to sip on while I type this.
Began the day by moving furniture and getting everything staged. Thought about those things I could disconnect and leave disconnected with minimal impact on the tank. So the first things I did were to plug all light fixtures into a power strip....directly into the wall, with now all lights ON. All these wires were moved to behind the canopy, out of the way where the cabinet was going.
Next was the MP10 power supply and controller. This powerhead is in my sump, and that would be receiving enough flow from the return pump circulation, so not a problem pulling it. Here's where I hit my first glitch. I had planned the power supply holder I built on a spare MP40 unit I had. I just assumed an Ecotech power supply, is an Ecotech power supply, is an Ecotech power supply. Well, I was wrong, but at first I thought, "no big deal." The MP10 power supply had it's feed wire offset, while the design of the holder had all feed line holes perfectly centered.....just like the power supply from the MP40 spare. I figured an easy fix, I'll just drill another hole slightly off to the side....done. I went to check the MP40 power supplies, which wasn't an easy feat, considering they were buried in the wire mess behind the equipment wall. Anyway, I reached behind and pulled one out, and here's were I now had a bigger problem. Not only was the wire offset, they were considerably bigger. So Ecotech obviously sourced different power supplies over the years. So out came the nice little holder I made to house all the power supplies. Here are three different power supplies....the one on the left is what was used to build the holder (an MP40 power supply, circa 2009), the middle one is from my MP10, and the one on the right is the current MP40 power supplies.

The next to be disconnected were the dosing pumps and containers. The first pump doesn't dose until 1AM, so no problem removing these for the day. Then the upper Reefkeeper came out. The only thing still connected to this were the ATO system and the pump for the carbon/gfo. This RK was mounted into the new cabinet.
And finally the tank was shut down and the second Reefkeeper was pulled off, with a simple sendoff and farewell to the temporary equipment board. Good riddance!

I started a stopwatch because I wanted to know how long the tank would be shut down. The stand was slid into place at about 1:30-2:00PM.....a lot later than I ever would have guessed. It took 55 minutes for me to restore powerheads and return pump, and another 10 minutes to get the ReefKeeper Expansion outlet installed and heat back on. The tank had dropped 8/10 of a degree to 77.2F. Since function was restored, I now started from the top of the cabinet and worked down.
Light power strips installed, with the power supplies for the Vortechs (without the organizer.) I will be doing another organizer to accommodate the larger units.....that wasn't expected. This will all be unseen, all hidden behind a false wall.

Next was the middle section....the guts of the electronics. I pulled all remaining plugs over from the stand and plugged everything in were it belonged. I eventually want to label everything with the p-touch when I have a chance, to make it look pretty.

Two little glitches with this middle section. The wire for the MP40 needed a little cutout to get to the back side of the board. You can see the little hook shaped hole above. The second was the wire for the pH probe was rigid coming out of the connector....couldn't be bent....and hitting the shelf. This fix was to cut a grove in the shelf to accommondate the stiff wire. It's hard to see, but there is a grove there for the pH wire.

By the way, the Belly of the Beast turned out perfect. That drop-down space was enough to clear the support beam in the stand. This shot is taken in the stand of the open space for the wires to easily get into the cabinet.

I will say that the wires in the Belly of the Beast are a mangled mess. I was hoping to have it well organized, but I was in a rush to get everything plugged in, and before you knew it, spaghetti. When I have time, I'd like to go back and straighten this up.
The bottom portion of the cabinet was easy.....dosing pumps and containers....done!

Amoungst all this caos, the UPS guy dropped off the Atman skimmer pump around 7PM. I got that put back together and found that the float switch/relay in the skimmate container wasn't working. I can only guess when the Atman shorted out, it fried the relay/float switch. I didn't want to chance a "new" skimmer with a skimmate container without the insurance of it turning off if it begins to puck. So I disconnected the container from the skimmer, and plugged off that tube. If it goes nuts, it will simply overflow the collection cup and go back into the sump. Not sure what I'll be doing about this relay/float switch thing....something for tomorrow.
And finally, here's were I am right now with this cabinet:


I'm still not finished. Need to do a little trim work and make the doors. WIth the false wall in the upper portion, and the light that shines through the fan cover from the canopy, I was thinking of putting a glass panel in that door frame. Got to give that additional thought. Or, maybe I can finally hang the now rusting plaque I recieved from MACNA that my wife never let me hang anywhere in the house. See'd never know it's behind that door! It's been collecting dust (and rust) in the fishroom closet since 2009.

I think I'm punch-drunk....I'm going to bed!