• Folks, if you've recently upgraded or renewed your annual club membership but it's still not active, please reach out to the BOD or a moderator. The PayPal system has a slight bug which it doesn't allow it to activate the account on it's own.

Chris P's 75 gal Dream Tank

DYIguy

NJRC Member
Picked up the tank today- almost gave it up thinking about the weight and moving it myself with the size- the 30 and 40 were no problem- the cube was a piece of cake. 2 associates put it on a cart and asked if I need help getting it into my car (?)- I joked that I have it under control and if it cracks while I'm loading it that I'll be be back in for another one- they just walked away- some guy in the lot helped me though. Time to look into building a stand- designs/ materials- this one may take some time- and I have to make room- it will end up where the 30l is ( which will be up for grabs- tank, hood and cabinet- free to me- free to you ) and there's a shelf that has to go with 50 years of pictures/ albums, memorabilia from 35 + cruises- will find a place for them- or recycle
 

horseplay

NJRC Member
congrats. 75 is a nice size. one suggestion, Kreg Pocket Hole Jig, if you don't have it I have one to lend. I have build many stands but never used one until the very last one I build. What a difference on aesthetics and strength.
 

redfishbluefish

Officer Emeritus
Officer Emeritus
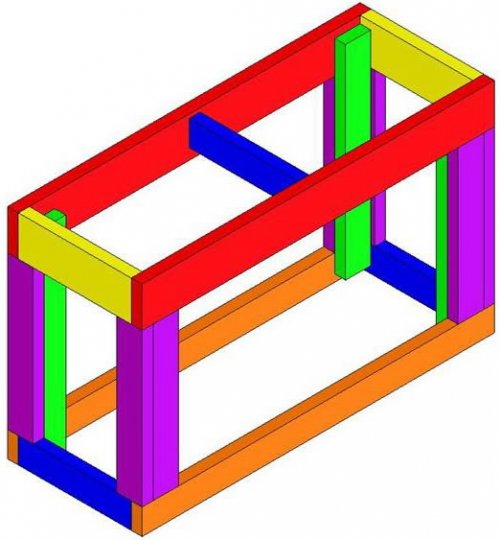
Here are your stand plans...and suggest 3/4 plywood top and skin with whatever floats your boat. All 2x4's with no center brace needed. This was designed by an engineer (Rocketengineer), so it will hold a ton a weight....way over engineered.

Stand.JPG
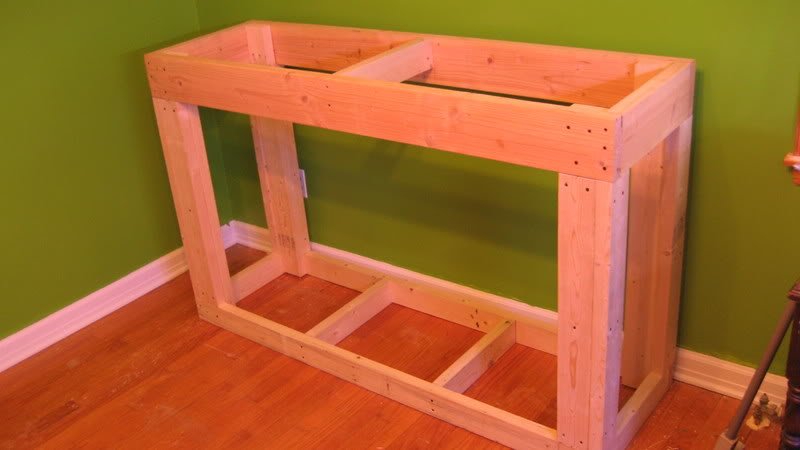
And here is what my stand frame looked like....note, top frame is 2x6 because it's a five foot tank.

OurStand.jpg
 

DYIguy

NJRC Member
Here are your stand plans...and suggest 3/4 plywood top and skin with whatever floats your boat. All 2x4's with no center brace needed. This was designed by an engineer (Rocketengineer), so it will hold a ton a weight....way over engineered.

View attachment 38969
And here is what my stand frame looked like....note, top frame is 2x6 because it's a five foot tank.

View attachment 38970
Thanks for the diagram- and color coded too- looks good- I got the tank off the truck and into the house today- took a bit of ingenuity, steel ramps, plywood, brick and concrete block, an extension to the plate on my hand truck and some nylon strapping- 18 steps ( not in a row- 50 ft or so ) whew- glad that's over
 

Salted

NJRC Member
Thanks for the diagram- and color coded too- looks good- I got the tank off the truck and into the house today- took a bit of ingenuity, steel ramps, plywood, brick and concrete block, an extension to the plate on my hand truck and some nylon strapping- 18 steps ( not in a row- 50 ft or so ) whew- glad that's over
And I sat home all day doing not much of anything. Next time you need a hand give a call.
 

DYIguy

NJRC Member
And I sat home all day doing not much of anything. Next time you need a hand give a call.
I'm just 'that' guy- got to do it myself- appreciate the offer- would rather take a trip to Mike's in Parsippany together sometime- got some cash burning a hole in my wallet lol
 

diana a

Staff member
NJRC Member
Moderator
here are directions to go along with it.....


The basic principle of the design is two box frames connected by four legs. The upper one supports the tank and transfers the load to the legs. The legs are made of several pieces of 2X4 to assist in construction and sheathing the stand in plywood for strength and cosmetics. The bottom frame transmits the load of the tank into the floor.

Design notes:
*The plan for this stand consists of 21 pieces. Like color pieces are the same length and of the same board size.
*The box frames are screwed together first, then the legs are built off the bottom frame, the top frame is then placed on top and secured to the legs.
*The green pieces are screw strips. These provide limited load strength but serve to make assembly easier and help keep the stand square.
*The blue piece between the upper rails (red) works to keep the upper rails from twisting.

Ok, now to the cut list:

First off: The calculations below are based off of a stand that is "W" inches wide X "D" inches front-to-back X "H" inches high.

(2) Red - Upper Rails: Length = W
These will be sized according to length: 2X4 for 48" or less for smaller tanks (Rule of thumb is 75g-90g); 2X6 up to 72" with 125g-150g being acceptable; For longer spans and larger tanks 2X8s are recommended.

(2) Yellow - Upper Ends: Length = D-3"
Theses will be made of the same material as the upper rails.

(4) Green - Screw Strips: Length = H-2" These 2X4s are shorter then the tank is tall.

(8) Purple - Uprights: Length varies:
- 2X4 Upper Rails: Length = H -7"
- 2X6 Upper Rails: Length = H-9"
- 2X8 Upper Rails: Length = H-10.75"
These 2X4s support the weight of the tank. The ones on the short sides of the stand provide a flat surface for attaching a plywood facing and while they do provide some strength, they are optional.

(2) Orange - Bottom Rails: Length = W
These 2X4s act to spread the weight of the tank over a larger area.

(3) Blue - Bottom Ends: Length = D-3"

Covering the sides of the stand with plywood will help to stiffen the stand against twisting and shifting. Doors can be mounted to the legs as desired.

So there it is. 21 pieces in 6 lengths equals a tank stand that should fit the bill for most people. There are other plans out there but this is a simple design using simple tools and common wood sizes. It may not suit everyone's application but it should fit the bill for most common size tanks. Should someone wish to have me calculate beam strengths for a specific application, PM me with the tank dimensions and I will be happy to run the numbers.

Happy building.


__________________
-RocketEngineer
 

DYIguy

NJRC Member
here are directions to go along with it.....


The basic principle of the design is two box frames connected by four legs. The upper one supports the tank and transfers the load to the legs. The legs are made of several pieces of 2X4 to assist in construction and sheathing the stand in plywood for strength and cosmetics. The bottom frame transmits the load of the tank into the floor.

Design notes:
*The plan for this stand consists of 21 pieces. Like color pieces are the same length and of the same board size.
*The box frames are screwed together first, then the legs are built off the bottom frame, the top frame is then placed on top and secured to the legs.
*The green pieces are screw strips. These provide limited load strength but serve to make assembly easier and help keep the stand square.
*The blue piece between the upper rails (red) works to keep the upper rails from twisting.

Ok, now to the cut list:

First off: The calculations below are based off of a stand that is "W" inches wide X "D" inches front-to-back X "H" inches high.

(2) Red - Upper Rails: Length = W
These will be sized according to length: 2X4 for 48" or less for smaller tanks (Rule of thumb is 75g-90g); 2X6 up to 72" with 125g-150g being acceptable; For longer spans and larger tanks 2X8s are recommended.

(2) Yellow - Upper Ends: Length = D-3"
Theses will be made of the same material as the upper rails.

(4) Green - Screw Strips: Length = H-2" These 2X4s are shorter then the tank is tall.

(8) Purple - Uprights: Length varies:
- 2X4 Upper Rails: Length = H -7"
- 2X6 Upper Rails: Length = H-9"
- 2X8 Upper Rails: Length = H-10.75"
These 2X4s support the weight of the tank. The ones on the short sides of the stand provide a flat surface for attaching a plywood facing and while they do provide some strength, they are optional.

(2) Orange - Bottom Rails: Length = W
These 2X4s act to spread the weight of the tank over a larger area.

(3) Blue - Bottom Ends: Length = D-3"

Covering the sides of the stand with plywood will help to stiffen the stand against twisting and shifting. Doors can be mounted to the legs as desired.

So there it is. 21 pieces in 6 lengths equals a tank stand that should fit the bill for most people. There are other plans out there but this is a simple design using simple tools and common wood sizes. It may not suit everyone's application but it should fit the bill for most common size tanks. Should someone wish to have me calculate beam strengths for a specific application, PM me with the tank dimensions and I will be happy to run the numbers.

Happy building.


__________________
-RocketEngineer
Will make things easier, Thanks- I built a stand for a 110 gal (4') with only plywood 30 something years ago- I think it was double 3/4"- won't go that way this time- just a thought/reflection
 

DYIguy

NJRC Member
Here are your stand plans...and suggest 3/4 plywood top and skin with whatever floats your boat. All 2x4's with no center brace needed. This was designed by an engineer (Rocketengineer), so it will hold a ton a weight....way over engineered.

View attachment 38969
And here is what my stand frame looked like....note, top frame is 2x6 because it's a five foot tank.

View attachment 38970
just wondering, did you allow for plywood when figuring out the dimensions for the frame- I'm thinking that the topper should be at least an inch more than the frame + plywood- so for a 4' tank, should the frame be 48"- 1.5 ( for 3/4 Ply ) or 48 and the topper be 48+ 1.5+ 1-2"- I figure for a 4' tank eight 2"x4" X 8' for the frame should be more than enough
 

Salted

NJRC Member
I didn’t. I built my stand to have the tank rim centered on the 2x4s. If I build another I’d like it a little shorter. I’d build my lower shelf differently also to have a lower stand and still have the equipment hight I need inside. Swing buy if you want to take some measurements and discuss.
 
just wondering, did you allow for plywood when figuring out the dimensions for the frame- I'm thinking that the topper should be at least an inch more than the frame + plywood- so for a 4' tank, should the frame be 48"- 1.5 ( for 3/4 Ply ) or 48 and the topper be 48+ 1.5+ 1-2"- I figure for a 4' tank eight 2"x4" X 8' for the frame should be more than enough

Depends if you want the panels to be flush with the tank, or if you want a lip on the top to put stuff on.
 
Consider the cabinet inside for your sump and skimmer. You want room to get your hand in there to do maintenance without a fuss. Mine is 36", I wouldn't go under 30". I'm 5'10" and it's a good height to look at comfortably while standing. If your gonna have a sofa is front of it to view, 30" might be good, but still gotta prioritize sump equiptment .
 

redfishbluefish

Officer Emeritus
Officer Emeritus
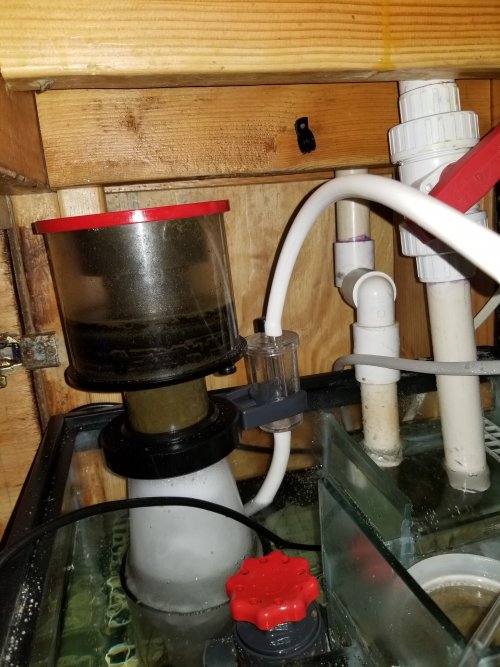
The "standard" stand height is 30 - 32 inches....way too short for me....for two reasons. I didn't want to have to bend down to look at my tank and I wanted to be able to get my skimmer out of the sump. I actually put together a cardboard cutout to make sure I could do this. I thought I had a 40B sump (that's what the store said it sold me), but later found out it was a 50B...same footprint, just a couple inches taller. So anyway, I went with 39 inches high and couldn't be happier.

1629218563537.png
 

diana a

Staff member
NJRC Member
Moderator
My stand height is at 37" high with a 40B as DT...with a over all height of 54". I would have liked the tank 4-6" higher, but then the tank height would have been higher than my arm pit. This would have resulted in me having to use a stool to work inside the DT

My sump is a 40B and the skimmer is 24" tall and is not on a skimmer stand. Need height to be able to remove it
 

DYIguy

NJRC Member
Just thinking, by @diana a armpit rule :D - I got 53 ", ( I don't want to have to stand on a step for maintenance ) less the height of the tank (21") which gives me 30-32" for the cabinet and sump- I'm thinking about a 20gL- which is is 12" high- not thinking about a skimmer right now- but if I were to add one @Goodair @redfishbluefish would this be enough room- and is the sump big enough for a 75g- do I really need to go higher with the stand- 30" looks good to me for viewing/maintaining
 
Skimmer are roughly 2' tall, then you add the stand (if needed ) and room to take the lid off. If you subtract the 2x4 on the bottom , that leaves you with 32 - 3.5 = 28.5", with no stand. If you want 32", you shouldn't put the 2x4s going across on the bottom and ur sump will sit on the floor.
The problem with this is different skimmers will have different water heights for best performance, so u can always raise a skimmer with a stand to match the water line , but you cant drop it since the baffles in the sump are set in place.
20210817_202521.jpg
1st baffle wall (waterline in skimmer chmaber) is 12" high, skimmer stand is 3 inches. 36" stand
 
Last edited:

DYIguy

NJRC Member
Finally got the lumber for the stand today- will allow space in the rear of the tank and drill holes for a sump ( may add later) going back to plan A with 2 internal (on the ends of the tank ) filters- semi centered overflow/ media with a chamber for heater(s) and chaeto and dual return pumps on both ends- plenty of area for bio filtration- will use ceramic discs and foam.
For the stand I'm using the design Redfish posted with 2x6" for the top rail, not much more$ than 2x4" and I'm adding a couple of inches to the length and width
 

DYIguy

NJRC Member
Back to square 1.5. I picked up a 75g tank with stand and hood today for free- the tank is free for pickup in Chester if anyone is interested. The plan was to use the stand and canopy for my new tank. Thing is, although it looks like a custom build, the stand is mostly laminate- a kit like you'd get from a store for a kitchen cabinet modified with trim- hard to believe that it can hold a 75g tank with water in it. I think I'll still use the basic form but use real lumber for the supports- the doors look good though
 

DYIguy

NJRC Member
Ordered plexiglass for in tank sumps today decided to have one at either end with a single return pump but with 5 chambers, 6" overflow and returns, 2" in between and a 4" center for chaeto, will work on buffing up the stand this week, and am keeping the 40b and selling the 29cube- giving away the 30L
 

Attachments

  • sump.pdf
    1,001.6 KB · Views: 6
Top