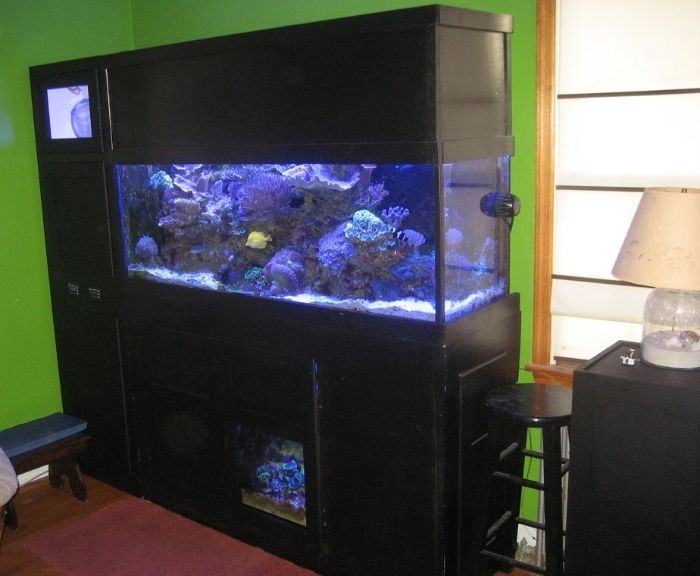
• Folks, if you've recently upgraded or renewed your annual club membership but it's still not active, please reach out to the BOD or a moderator. The PayPal system has a slight bug which it doesn't allow it to activate the account on it's own.

Inherited 90

redfishbluefish

Officer Emeritus
Officer Emeritus
I documented my return pump woes HERE, were I did something stupid. I just wanted to document the replacement of that pump, old-four-screws, with a new MAG 9.5. This way I know when the new one went in. Can't complain because old four screws lasted over eight years.


Being a back-up fanatic, I also picked up another new MAG 9.5....so I'm all set for another eight plus years!

I think I'll get six new HD stainless screws and then use this pump to empty water off the pool cover. It still has some life left in her! Prior to this I've been using a MAG 7 to empty the pool cover.
 

redfishbluefish

Officer Emeritus
Officer Emeritus
Skimmate Container Float Switches

With the skimmer pump shorting out and cooking the old float switch in the skimmate container, a new float switch and relay were installed. I documented this DIY HERE. The new float switch has a secondary backup, unlike the original.


ATO Reservoir Low Water Indicator

This is a work in progress...but very simple. Since building the three sided box to cover the ATO reservoir container, I needed a way to know when the water bottle was empty, and needed to be changed. Before the cover was made, I simply could see that the bottle was empty. I've picked up a horizontal float switch and plan on simply attaching this to an LED and wall wart to let me know when the bottle is empty. The one concern I had was whether or not the float switch would be water tight up against the curve of the bucket it's going in to. Here I'm simply testing that it sits flush before drill the actual bucket. Looks good!

 
I need something like that. Some advance notice that my topoff bin is running low would be handy.

Sent from my LG-H811 using Tapatalk
 

Mark_C

Staff member
Officer Emeritus
NJRC Member
Moderator
Thanks. I'm just wondering if it's too much black.

Goth is in dude! Or you can sit on that stool and slam out some beatnik freestyle poetry.

Seriously, looks great. What are you running for DT, is that a single MP40?
 

redfishbluefish

Officer Emeritus
Officer Emeritus
@Mark_C , thanks for the reassurance with all that black. I had a similar concern about the amount of black eye shadow I had on when my wife and I were on the cover of Weekender in 2009......I'm guessing that looks fine as well? :eek:

how-to-stay-goth-past-50.jpg


Thanks for the compliment Mark. I'm running two MP40's in a five foot tank.....one on either end of the tank.


And @dougc , this is so simple....and inexpensive.....I'll post all the detail when I'm done, but it is simply a 2-3 dollar float switch (from China), a bipin LED (pennies), and a 2.9 volt wall wart I had saved from some piece of electonics I no longer have......I have a shoebox of old wall warts. Again, when I'm done, I post it all.
 

redfishbluefish

Officer Emeritus
Officer Emeritus
Skimmate Container Float Switches Finished

The last piece arrived today.....wall transformer....and the float switch cutoff was put back into service for the skimmate container. It amazed me how lazy I've become with all the automation on the tank. For the last month I had to empty my skimmer cup every couple days. (Do you feel sorry for me?) I'd become spoiled with the skimmate container. Well, I'm back in business now, so I can sit back and relax.

Here's the relay project box (lower right) in comparison to the skimmer pump plug outlet. The skimmate container is through that opening just below the relay.


redfishbluefish

Officer Emeritus
Officer Emeritus
Since building a cover for my ATO reservoir (posts 445, 448 and 449 above), I can no longer see the water bottle, and therefore I don't know when it is in need of another bottle of water.


Here is my simple solution.....and I'll include detail for those who wish to do something similar.

I had ordered a horizontal float switch from eBay HERE, for $1.78, and tested to make sure it would seal on the curve of the five gallon bucket (post #463 above). This float switch was mounted in the lower bucket reservoir.


The wires to the float switch were run to the equipement cabinet. A hole was drilled in the stand between the two ReefKeeper head units. An inexpensive bipin LED (Amazon buy of 60 LEDs for $3.75 HERE), was first mounted to a dowel with groves for the wire leads.


I already had a wall wart in a shoe box full of old wall warts from electronics that have since long been pitched. I used a 2.9 V wall wart, since the LED was listed as a 3 - 3.2 volt LED.

So now, when the water drops below the level of the float switch, the LED will light up letting me know I need to put a new bottle on the reservoir.


Life is good!
 

redfishbluefish

Officer Emeritus
Officer Emeritus
Thanks for the kind word Mike, Marcus and Jim. :D


So I've come to the realization that my apparent procrastination, in part, is due to my over thinking solutions....and wanting all parts of the solution to be as DIY as I could make it.....Oh, and costing close to nothing. This became clear in the above project of the water reservoir warning light in wanting to cover the back side of the LED. I wanted to make my own cover, and actually played with a couple different choices.....a black plastic pole top cover....a small spice container....and the measuring cup to our laundry detergent. I actually had other things under consideration, but these are the three that were tested. But here's where the time went....this whole process of identifying things as potential covers, and then testing them, took about a week.


The pole cover was too small, and the spice cover, although threaded, the top needed to be epoxy glued into a depression. So I went with the detergent cup. The hole saw kerf (groove) allowed a snug fit of the cup....no glue or other attachments were needed to hold the cup in place. A hole was drilled in the middle of the cup to accept the wires.


redfishbluefish

Officer Emeritus
Officer Emeritus
Per request, here's the very simple wiring diagram. What is important with this wiring is that the LED has a specific positive side and negative side. If it is not wired correctly, it will not light. I just so happen to run the positive wire over to the float switch. I could have easily run the negative wire over to the float switch as well, just as long as with the LED, the positive wire went to the positive side of the LED.

With this particular LED, the longer of the two leads was the positive side. I didn't know this at first and simply determined this by first identifying the positive wire on the wall transformer and alternating the two wires from the transformer to the LED until the LED lit up. Now I knew what side was positive.

I also soldered every connection. With most I use shrink tubing to cover up the bare wires. In the case were I used a wire nut, I still soldered the wires first and then covered with the wire nut.


Again, a very simple wiring diagram.

FYI, my out-of-pocket cost of doing this little LED project was the $1.78 for the float switch and, I ran out of shrink tubing....so $1.97 for another package of shrink tubing. That's it! I got the LED from my future son-in-law (for nothing....well, it cost me a daughter - :rolleyes:), and I had the wall transformer from a small electric screwdriver that was trashed years ago.
 
Last edited:

redfishbluefish

Officer Emeritus
Officer Emeritus
My stupidity will never cease to amaze me! Yes, another DOH! moment.

After finishing up the equipement cabinet in flat black....spray painted....I started repainting the stand to match the side cabinet. I wanted to do this is steps since it will be sprayed. I turned off the skimmer and put masking tape along the floor. I then used a piece of cardboard to "mask" the areas I didn't want to paint....the floor, the tank, to mention two.

Here's the thing....I should know about overspray. I use to paint cars back in the late 60's, early 70's. This was way before paint booths and fancy filtration systems to filter out the paint. We simply would put up polyethyene film around the area in the shop where we would paint the car. We would wear full suits and masks, but they didn't do much. I could stick my pinky finger in my ear a week later and say, "Oh look, we painted that car blue!"

Anyway, after finishing painting the front of the stand....and thinking everything looks good, I pull up the tape......DOH!


Lucky for me, a little Pine Sol and scrubbing got up the overspray on the floor. The glass on the tank was covered in black dust as well, but easily cleaned up. Saved!
 

redfishbluefish

Officer Emeritus
Officer Emeritus
My low water ATO reservoir LED light crapped out. I'm not surprised, considering I was running this bipin LED at 2.9 volts....the upper limit of the LED.....with a wall-wart that probably is not very accurate with voltage.


I'm guessing it burnt out on the first low water situation.

I finally got around to fixing it. We had an electric wine opener that was no longer holding a charge. It had an LED in the top that I pulled out. I also decided to use a resister to "lower" the voltage going to the LED. Here's the LED in my little holder, with the resister....and the old LED off to the left.


And here it is installed showing low water in the ATO Reservior.


(FYI, we now have to manually open our wine bottles....the humanity! :D)
 

redfishbluefish

Officer Emeritus
Officer Emeritus
Switching Teams: AC to DC

I've made the switch from an AC MAG 9.5 to a Waveline DC6000 DC return pump. (Thank you Tommy for a great deal) In the process, with the extra flow, I built my first manifold....a single pipe feed to my dual BRS reactor....does that still qualify as a manifold?


When I figured out what's needed for my biopellet reactor, I plan on adding another tee to feed that as well. So in the process, I've now eliminated a Cobalt MJ`1200 as well as the MAG 9.5.....and with the biopelllets, the Sicce Syncra 1.5 pump on my JNS Alpha 2 biopellet reactor, in the future.

Back to the return pump, I'm a backup fanatic, and have three MAG 9.5's that I'll continue to use as backups. I originally planned on simply putting in the half union to connect to my system, but I could not find a union that fit the one I put in nine years ago. I'm assuming it's a Chinese thing, since the ones I find now are all made in China, and my original one has no label of origin. So I had to cut out and replace the entire union.

In addition to the new pump, I'm not crazy about hook-and-loop (Velcro) and made brackets for the power supply and pump controller.


It's been running for about an hour now and I have no complaints!
 

horseplay

NJRC Member
Good job! DC pumps are great if only they make one for high head pressure I will switch in a heart beat. The ones working with pressure are those made in Germany and they cost thousands of dollars.

For your manifold I would have a union right at the output of the pump so you can swap the pump out without touching anything else. I have mine setup like that and it's easy to train someone else.
 
Top