• Folks, if you've recently upgraded or renewed your annual club membership but it's still not active, please reach out to the BOD or a moderator. The PayPal system has a slight bug which it doesn't allow it to activate the account on it's own.

New home, new build!

I'm going through post this in separate posts in my thread for each section of this build, I took alot of pics and I decided to share it with you guys now that the 2 months of building is complete

So usually when we (reefers) move into a bigger home we instantly go twards a bigger build.. and eventually I will. Lol
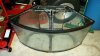
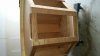
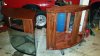
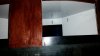
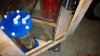
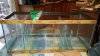
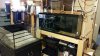
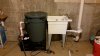
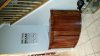
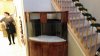
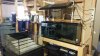
So this build starts with my old 92g corner tank that I had in my old place, some of you have seen it.. well when I moved the stand fell apart and I figured I was gonna go bigger anyway so it didn't matter. Well I didn't so I started looking for a stand for my tank that could fit my 54g custom sump.. found a guy on CL selling what he said was a 92g corner tank with stand and canopy. For dirt cheap. So I drove to Philly to get it and realized the tank was not a 92 bc the back didn't go into a stair corner It had a back pane hat cut out a triangle.. I figured no big deal I only wanted the stand and canopy anyway, and figured I would just build out the back of the stand to support the tank. So I took it and almost told him to keep the tank. Well I get home and I lay the canopy on top of my tank and it's 1/2" short and the radius of the front glass were different. And the tank wouldn't sit on the stand even if I modified it.. so I decided to use the tank that came with it and go all out. But this tank is only about 75-80g. So the first thing in had to do was strip the stand and refinish it. So I sanded it all down stained it with a cherry walnut and then added about 15 coats of polyurethane to seal the entire unit. I also painted the inside of he canopy white to better reflect the light.
 

Attachments

  • uploadfromtaptalk1422127102901.jpg
    uploadfromtaptalk1422127102901.jpg
    93.2 KB · Views: 81
  • uploadfromtaptalk1422127186552.jpg
    uploadfromtaptalk1422127186552.jpg
    95 KB · Views: 83
  • uploadfromtaptalk1422127256316.jpg
    uploadfromtaptalk1422127256316.jpg
    86.8 KB · Views: 77
  • uploadfromtaptalk1422127317436.jpg
    uploadfromtaptalk1422127317436.jpg
    96 KB · Views: 75
  • uploadfromtaptalk1422127367885.jpg
    uploadfromtaptalk1422127367885.jpg
    94.8 KB · Views: 72
Looking good. I remember your old tank from the group buy! I had a 55 that I painted a very reflective silver to all light. I think (IMHO) it was a little better than the white I have in my current tank. Following along as I like the tank shape, and it refreshing to see with all the grey outside.
 
So the second step now was to figure out how I'm going to filter this bad boy and what will fit in the stand. So I went with a 20g tank, added baffles and making sure I didn't waste an inch of real estate inside the stand. So I had to notch the stand to let the tank sit back far enough for the doors to close (only part that really sick about a corner tank is triangular shape doesn't leave alot of room for rectangles) I also needed to make sure I could fit my filter socks, my Diablo 200 skimmer (yes it's rated at 250g, bigger is better!) My zeovit reactor (1.5l) my ATO floats, the carbon reactor return pump and oh yeah my calcium reactor. I also need to make sure there was enough room for my manifold, my controller, and my vortec controllers for my MP's.
 

Attachments

  • uploadfromtaptalk1422127746804.jpg
    uploadfromtaptalk1422127746804.jpg
    92.2 KB · Views: 61
  • uploadfromtaptalk1422127780930.jpg
    uploadfromtaptalk1422127780930.jpg
    97.6 KB · Views: 57
  • uploadfromtaptalk1422127826177.jpg
    uploadfromtaptalk1422127826177.jpg
    84.2 KB · Views: 59
  • uploadfromtaptalk1422127916045.jpg
    uploadfromtaptalk1422127916045.jpg
    98.9 KB · Views: 59
  • uploadfromtaptalk1422127943918.jpg
    uploadfromtaptalk1422127943918.jpg
    99 KB · Views: 56
I also had to drill the tank (and yes I had a post asking for help) but I maned up and bought good glass bits, modeling clay and got er done. I used the H2Overflow kit which was featured on reef builders. Great kit by the way. With syphon break returns. After installing that and running all my plumbing it was time for sand and rock. Which I got from a local friend who imports the whitest sand and a guy from Facebook Billy Hayes who got me the dry rock for my tank I also got 2 full spectrum led panels (ebay specials) after filling it up and doing a freshwater test I found a leak on a seam in the back about 6in from the bottom. I had to drain the tank and cut the seam out, reseal it and pray.. after letting it cure, and filling it back up, no leak! Thank god.
 

Attachments

  • uploadfromtaptalk1422128244322.jpg
    uploadfromtaptalk1422128244322.jpg
    92.9 KB · Views: 49
  • uploadfromtaptalk1422128279188.jpg
    uploadfromtaptalk1422128279188.jpg
    88.7 KB · Views: 44
  • uploadfromtaptalk1422128497003.jpg
    uploadfromtaptalk1422128497003.jpg
    95.8 KB · Views: 44
  • uploadfromtaptalk1422128531517.jpg
    uploadfromtaptalk1422128531517.jpg
    95.1 KB · Views: 42
  • uploadfromtaptalk1422128568336.jpg
    uploadfromtaptalk1422128568336.jpg
    90.8 KB · Views: 49
  • uploadfromtaptalk1422128596917.jpg
    uploadfromtaptalk1422128596917.jpg
    97.1 KB · Views: 52
  • uploadfromtaptalk1422128640766.jpg
    uploadfromtaptalk1422128640766.jpg
    94.6 KB · Views: 47
So now it's cycling, I have my qt system in the basement for both fish and coral. I aquired a 55g deep blue double vision tank which I'll be using for my fish qt on one side and my photon/nebula clown pair home on the other. I'm also using a deep blue 30g rimless for my coral qt. I'm using a 6 stage air water ice Ro/Di which I'm about to replace bc I get phosphates coming through my unit. I just got a spectrapure 180gpd 6 stage double DI with booster pump, auto flush valve and pressure switch. So hopefully that will fix my issues with that. I also added a salt mixing station as well as a slop sink to have somewhere for waste water ..
So that's where we are up to, tank is cycling now for about 3 weeks and is almost ready. Thanks to zeo.
 

Attachments

  • uploadfromtaptalk1422128995539.jpg
    uploadfromtaptalk1422128995539.jpg
    99 KB · Views: 54
  • uploadfromtaptalk1422129057777.jpg
    uploadfromtaptalk1422129057777.jpg
    91 KB · Views: 51
Beautiful job Mike. Can't wait to see this up and running and possibly in person now that your all if 5 mins away.
 
Lol yeah man. I haven't seen yours yet either hah I work around the corner from you and live 5 min away now ha but we'll get together soon.
 

mrehfeld

Officer Emeritus
NJRC Member
When I setup my 54 gallon corner I learned a lot of the lessons you have. Trying to squeeze 10 lbs of stuff into a 5 lb. bag make you get creative. Wire and hose management becomes paramount. I hung reactors from the top frame and my controller to the door. Good luck with the build, I'll be tagging along.
 
I used up all he real estate available. I even notched the reactor base to fit the angle of the corner so it would fit I side the cabinet. When I had my 92g I was able to custom make a 54g into a sump with a huge fuge and had lots of room for my reactors. And what didn't fit like my dosers and chiller sat behind my couch. But this unit sits in my front hallway so I can't have anything exposed.
 
These are my clowns that are in qT now. They're called mocha frostbite. Only me and one other guy has them. They came from a breeder in Florida who only had 6 of this pattern. So I got 3 and he got 3. The rest showed other traits. The parents are true Darwin (f) and S.A. Frostbite (m) pic of parents included.
 

Attachments

  • uploadfromtaptalk1422150547830.jpg
    uploadfromtaptalk1422150547830.jpg
    95.7 KB · Views: 43
  • uploadfromtaptalk1422150682719.jpg
    uploadfromtaptalk1422150682719.jpg
    84 KB · Views: 43
A few more pics of the build. Enjoy!
 

Attachments

  • uploadfromtaptalk1422150718457.jpg
    uploadfromtaptalk1422150718457.jpg
    90.7 KB · Views: 54
  • uploadfromtaptalk1422150754915.jpg
    uploadfromtaptalk1422150754915.jpg
    93.4 KB · Views: 57
  • uploadfromtaptalk1422150791586.jpg
    uploadfromtaptalk1422150791586.jpg
    95.6 KB · Views: 52
  • uploadfromtaptalk1422150837427.jpg
    uploadfromtaptalk1422150837427.jpg
    90.8 KB · Views: 51
  • uploadfromtaptalk1422150874482.jpg
    uploadfromtaptalk1422150874482.jpg
    97.1 KB · Views: 53
  • uploadfromtaptalk1422150904863.jpg
    uploadfromtaptalk1422150904863.jpg
    89.6 KB · Views: 49
  • uploadfromtaptalk1422150942493.jpg
    uploadfromtaptalk1422150942493.jpg
    99 KB · Views: 56
  • uploadfromtaptalk1422150974781.jpg
    uploadfromtaptalk1422150974781.jpg
    92.2 KB · Views: 55
  • uploadfromtaptalk1422151028505.jpg
    uploadfromtaptalk1422151028505.jpg
    97.7 KB · Views: 51
  • uploadfromtaptalk1422151052457.jpg
    uploadfromtaptalk1422151052457.jpg
    96.1 KB · Views: 58
Yea lol it definitely was. Now you know y I stayed with this tank instead of trying to make the 92 fit. It would have stuck out about an inch past the hall door. I even have enough room with his tank to fit he mp10 dry side on the outer edge. I have an mp40 in the back wall facing out. I was thinking about the gyre but not sure how it would work on a curved tank and I'm not a fan of wires in the tank. I feel like I graduated from that when I stopped using a cansiter filter lol
 
Added some frags today.
1a6b380aec7142f9c6bfd93f1a3b3df4.jpg
 

kschweer

Administrator
Staff member
Officer Emeritus
Moderator
Looks great man. How are those clowns doing?


Sent from my iPhone using Tapatalk
 
Top