-
Folks, if you've recently upgraded or renewed your annual club membership but it's still not active, please reach out to the BOD or a moderator. The PayPal system has a slight bug which it doesn't allow it to activate the account on it's own.
You are using an out of date browser. It may not display this or other websites correctly.
You should upgrade or use an alternative browser.
You should upgrade or use an alternative browser.
120g Into the Sea -- My First Saltwater Build
- Thread starter Nijessi
- Start date
I use to put my heaters in the over flow chamber. Standing up one on each over flow.Hmmm uh oh - I picked up 2 Eheim 250w heaters for the tank. But they are too long to fit in the bottom of the chamber in the sump....the sump is rated for a 200 gallon tank and the heaters are rated for a 150g tank. Is there a brand that is shorter but still rated for a tank my size?
This also makes sure all water comes In contact. You can also on some heaters keep some of it out side the sump.
you 100% need a heater controller.
The inkbird at amazon is not expensive and it’s worth Avery penny.
I have my heaters connected to the inkbird and then to apex. So I have 3 layers of protection.
Oveflow might work - I'll check then length when I get back to the house. Do I need a controller for both heaters or can I plug both into the inkbird and just share the load?I use to put my heaters in the over flow chamber. Standing up one on each over flow.
This also makes sure all water comes In contact. You can also on some heaters keep some of it out side the sump.
you 100% need a heater controller.
The inkbird at amazon is not expensive and it’s worth Avery penny.
I have my heaters connected to the inkbird and then to apex. So I have 3 layers of protection.
@amado is this the one you are referring to:
Amazon.com: Inkbird ITC-308 Digital Temperature Controller 2-Stage Outlet Thermostat Heating and Cooling Mode Carboy Homebrew Fermenter Greenhouse Terrarium 110V 10A 1100W: Industrial & Scientific
Buy Inkbird ITC-308 Digital Temperature Controller 2-Stage Outlet Thermostat Heating and Cooling Mode Carboy Homebrew Fermenter Greenhouse Terrarium 110V 10A 1100W: Temperature Probes & Sensors - Amazon.com ✓ FREE DELIVERY possible on eligible purchases
www.amazon.com
Update!
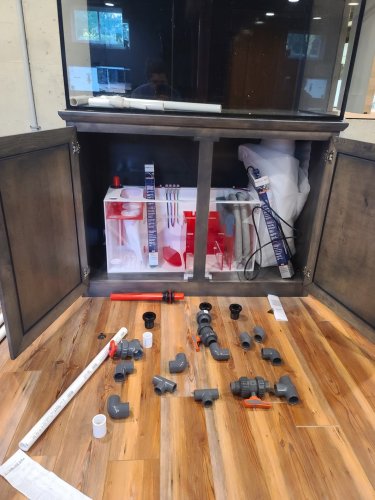
Got most of my plumbing for the sump -- missed a couple pieces that should be arriving tomorrow. Found a great plumbing supplier right down the road (Stevenson's) that has almost everything you could possibly want at good prices. My neighbor came over with his pex kit and helped me run a pex line to the area in the crawl space right behind the tank so NOW I can relocate my RODI and storage tank to the other side of the wall!! Ordered a dosing pump (great idea @amado!) and going to pickup a smaller 5-10 gallon container of some sort so I can setup AWC and ATO. Picking up rock and sand tomorrow from @ericrodriguez -- looking forward to meeting another NJ reefer! Moving and shaking over here!
Also, being real I am nervous about setting up the hard plumbing. A bit of a worry wart and I don't want to waste parts -- ESPECIALLY the gate and ball valves.......deep breaths.....Any tips?


Jamie S
NJRC Member
I’m really enjoying this thread (mostly because I’m jealous and my wife won’t let me get a 120 YET lol). Best advise I can give with the pvc is cut and piece it together as you go. Dry fit it and don’t glue anything yet. Then once you like what you’ve done, then start gluing 1 piece at a time. This way you can be confident the valves can be glued without issues
Well, I might as throw my 2c in as well.
I recommend dry fitting the entire system. Cut it all, dry fit it all together, make sure you're happy and you can easily reach and work everything.
Go to bed and sleep on it.
Got to work and think on it. Draw some doodles on a legal pad.
Come home and stare at the dry fitted system.
Did you pipe in a manifold in case you ever add anything or need to divert water?
Did you add enough valves to control water and turn off if necessary to isolate leaks in main lines?
Did you do a quick connect to the big stuff like the main return pump so you can take it out easily?
etc...
Then, redo if needed.
Now...
Go grab a sharpie and, while it's all dry fitted together, make marks across the joints, when you glue the pipes together, line up the marks.
There ya go, MHO.
Oh, and, a PVC cutter is one of the best tools I've bought in ages. Dont buy the cheap one, drop $40 for a decent one that cuts 1 1/2" or better, and you'll be amazed how often you use it, cuts PVC cleanly and like butter.
Editing for heating and heat controller thoughts:
As Amado said, the heater controllers are pretty affordable and worth every penny if you're not going to go full automated (Apex or such).
For my 30g tank I need about 200w of heating. I use the 2 heater philosophy of add 50% for 300w total and split it into 2x 150w heaters. If one fails off, the other has the ability to maintain enough heat. If one fails on, it wont raise high enough to fry anything. I keep an extra 150w in the garage for when one of them eventually fails. The temperature controller display, and a small hang on thermometer in the sump let me know things are OK for the moment.
As per controllers, I use an Bayite controller with the 'heater' output connected to the 2 heaters (line split) and set to go on if the tank drops below 76, and turn off at 78. The heaters themselves are set at 78. Note triple redundancy here, if either heater fails on, if the controller fails on, or if 2 components fail, the tank should be fine.
The 'cooling' plug is connected to a sump fan and is set to turn on if the heat raises above 80, and turns off at 78.
It's remarkably accurate (though you need to watch a youtube tutorial to program) and my tank runs comfortably at 78, give or take a few decimals.
For $40, its a great investment.
Here's the Bayite. I've used the same unit for 3 years no with no failure, its a pretty simple box... bayite Temperature Controller 1650W BTC211 Digital Outlet Thermostat, Pre-Wired, 2 Stage Heating and Cooling Mode, 110V - 240V 15A: Amazon.com: Industrial & Scientific
Here's the Inkbird, ran one of these for a while as well, pretty much the same thing... https://www.amazon.com/Inkbird-Itc-...=temperature+controller&qid=1598576090&sr=8-7
Last edited:
Update:
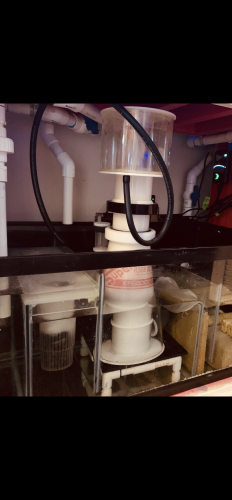
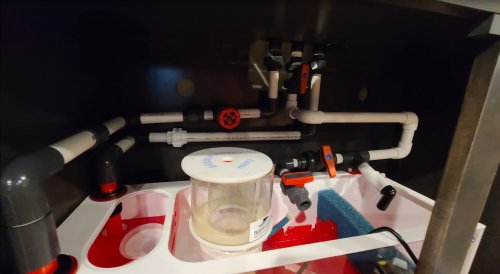
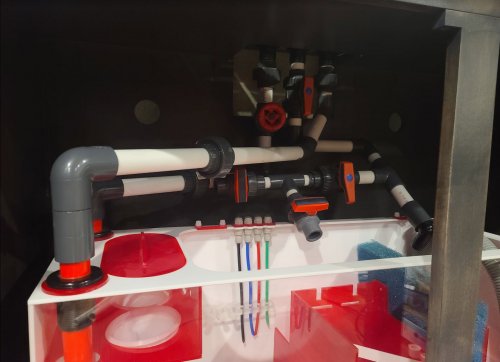
Ok, first dry fit in place and I would love some thoughts. My main issue right now is that the e-drain is close to the skimmer. I can still get the cup off and everything fits but its close. I'm also wondering if the skimmer is sitting properly - hope I didn't go to big... Also, I was going to put a manifold with two access valves but I think I may have to bring it down to 1 - or should I leave the ball valve that oes to the manifold run and just take the actual PVC there out for the space since I probably won't add anything for awhile and I can just build off that 1" ball valve if I do? Also worried that I should've gone with a bigger sump. I got a great deal and it's designed for a 200 gallon tank (Pro Clear Red 1 in 1 200) but I have the space for the step up 300 and that may give me better room for the manifold....So much 2nd guessing. Video below is a quick walkthrough of where I'm at now.
Photo of the dry fit w/out skimmer:
Some photos of the skimmer in place.
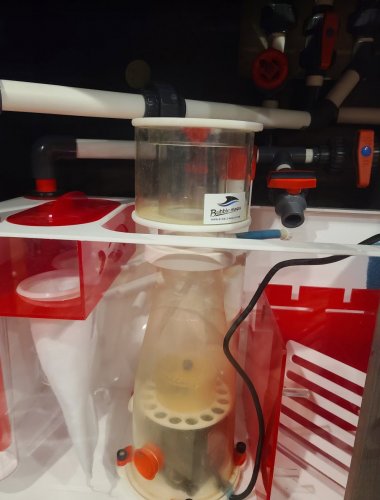
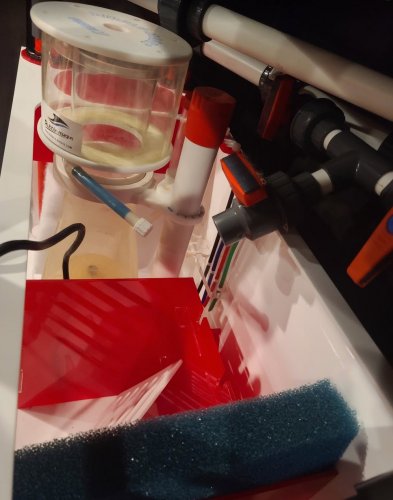
Ok, first dry fit in place and I would love some thoughts. My main issue right now is that the e-drain is close to the skimmer. I can still get the cup off and everything fits but its close. I'm also wondering if the skimmer is sitting properly - hope I didn't go to big... Also, I was going to put a manifold with two access valves but I think I may have to bring it down to 1 - or should I leave the ball valve that oes to the manifold run and just take the actual PVC there out for the space since I probably won't add anything for awhile and I can just build off that 1" ball valve if I do? Also worried that I should've gone with a bigger sump. I got a great deal and it's designed for a 200 gallon tank (Pro Clear Red 1 in 1 200) but I have the space for the step up 300 and that may give me better room for the manifold....So much 2nd guessing. Video below is a quick walkthrough of where I'm at now.
Photo of the dry fit w/out skimmer:

Some photos of the skimmer in place.


Curious about the return line. It appears to go up between. The main drain and the overflow. It’s that why you chose not to go bean animal. Because the third drain on the overflow is actually the return?
Yes - the SC Aquarium is drilled for a herbie style drain so the center hole is for the return which goes up a T shaped PVC in the overflow
Ok. Understood. Looks very nice. How’s that skimmer. Looks Like it might be a pinch tight in there would raising the left front drain make it a little more serviceable. You will appreciate anything that makes working in the sump area a little easier.Yes - the SC Aquarium is drilled for a herbie style drain so the center hole is for the return which goes up a T shaped PVC in the overflow
The skimmer (bubble magnus 7) was one of my finds off Facebook marketplace. It is tight at the top. I can try to raise up the edrain to make getting the cup off easier. I'm wondering if the skimmer is too large for the sump? as long as its intake is submerged it should be ok, right?Ok. Understood. Looks very nice. How’s that skimmer. Looks Like it might be a pinch tight in there would raising the left front drain make it a little more serviceable. You will appreciate anything that makes working in the sump area a little easier.
Jamie S
NJRC Member
Looking great so far. I may recommend running the drain pipes parallel to the back wall and 90 over to the sump Instead of diagonal across the sump. It might make it easier to service the sump as well as making the second manifold useful in the future. I’m sure more experienced people will have better input than me, but I would think a hose coming off of the pump instead of pvc will make the pump easier to service as well as lessen the chance of vibration through the pvc.Update:
Ok, first dry fit in place and I would love some thoughts. My main issue right now is that the e-drain is close to the skimmer. I can still get the cup off and everything fits but its close. I'm also wondering if the skimmer is sitting properly - hope I didn't go to big... Also, I was going to put a manifold with two access valves but I think I may have to bring it down to 1 - or should I leave the ball valve that oes to the manifold run and just take the actual PVC there out for the space since I probably won't add anything for awhile and I can just build off that 1" ball valve if I do? Also worried that I should've gone with a bigger sump. I got a great deal and it's designed for a 200 gallon tank (Pro Clear Red 1 in 1 200) but I have the space for the step up 300 and that may give me better room for the manifold....So much 2nd guessing. Video below is a quick walkthrough of where I'm at now.
Photo of the dry fit w/out skimmer:
View attachment 31080
Some photos of the skimmer in place.
View attachment 31078View attachment 31079
That looks great. Seriously... looks very serviceable. And pretty to boot. As far as manifolds. I’m not a fan and don’t use one. The advantage is you save on a small pump. The problem is you alter how your tank drains every time you add something and have to adjust your herbie. And as a consequence, steal a little flow from the return. Now of course if you steal return flow for say a reactor. You can fix that by putting a pump like an mp-40 in you display to make up the difference. Seems counter productive. Dosent make manifolds wrong. In fact if you put an oversized return pump you can plan on a manifold. But there we go again why not just get a small pump to run the reactor. And on top of all that. I haven’t actually needed an added pump or manifold port because in my case I use a dosing pump. Not the best application for a manifold port.


