

My wife always complains that I'm cheap, and still have my Communion money. Here is my shot at a DIY for a float switch with minimal expendature. Note that this could be used for an ATO by simply adding a small pump, such as a Tom's Aqualifer. I will give as much detail as I can, including were I purchased and how much I paid. This is a work in progress, so I'm hoping it works when I get done. The disclaimed is that I know as much about brain surgery as I do about electronics....you've been warned. 
To start this project off I ordered/purchased the following items:
Double Pole Relay from Amazon..............................................$3.25 (free shipping)
Float Switches from eBay..........................................................$1.00 (free shipping)
Electrical Box for Home Depot.................................................$1.28 (tax included)
I actually purchased five of the float switches, but for this project, I'm only using one (for now). If you're building an ATO, I'd highly recommend using two float switches connected in series, with one float switch slightly higher than the other. This "higher" switch is the secondary fail switch when the first one fails.....and it will fail!
The first thing I did was make a project box for the relay. I used an inexpensive plastic electrical box from HD.
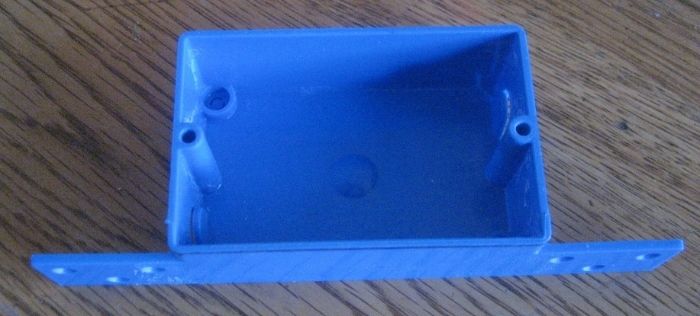
I cut off the tails, and using a scrap pieces of acrylic, made a cover for the box. Now the relay doesn't fit into this box, but the only thing I need to protect are the electrical contact screws from my fat fingers....especially the 110 volt side.

So to make it fit in the box, I cut a hole in the side to fit the relay itself. This reminded me of the audio freaks I know who have tubed amplifiers where the tubes are exposed. They are under the belief that their crappy human ears can distinguish the oh-so-slightly improved sound quality.
With a shot of my favorite black spray paint (98 cents a can), here's the project box with relay.

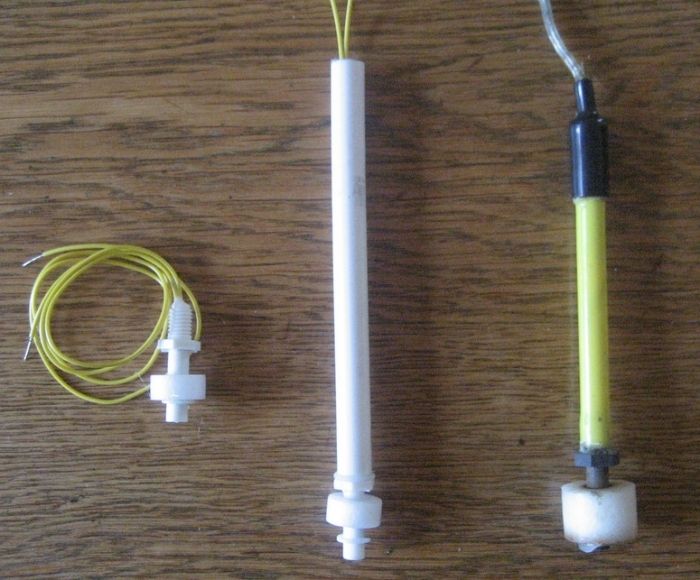
For the float switch, the old one was on a rod portion, and attached with a screw clamp. To replicate this rod portion, I took the fattest plastic hanger I could find and cut it up. To my surprise, part of the inside already had a hole. Using a long bit (masonry hammer bit), I finished drilling the center of the rod. I then drilled and tapped the one end of the rod to fit the float switch. The threading was M8-1.25 (metric). I don't have metric drills, but the 17/64 inch (0.26563"), bit was close enough to the required 0.26378 inch hole that was needed. From left to right, the new float switch, the new float switch attached to a piece of hanger rod, the old float switch.
I'm at a stand still right now because the numbering on the relay plug is different from what I'm use to......and the battery in my multimeter is dead to figure out the arrangement. TO BE CONTINUED!
Expenditure so far.......$5.53. If you want to include the paint (I had that sitting around, and it only took a squirt), add another $0.98.
To start this project off I ordered/purchased the following items:
Double Pole Relay from Amazon..............................................$3.25 (free shipping)
Float Switches from eBay..........................................................$1.00 (free shipping)
Electrical Box for Home Depot.................................................$1.28 (tax included)
I actually purchased five of the float switches, but for this project, I'm only using one (for now). If you're building an ATO, I'd highly recommend using two float switches connected in series, with one float switch slightly higher than the other. This "higher" switch is the secondary fail switch when the first one fails.....and it will fail!
The first thing I did was make a project box for the relay. I used an inexpensive plastic electrical box from HD.

I cut off the tails, and using a scrap pieces of acrylic, made a cover for the box. Now the relay doesn't fit into this box, but the only thing I need to protect are the electrical contact screws from my fat fingers....especially the 110 volt side.

So to make it fit in the box, I cut a hole in the side to fit the relay itself. This reminded me of the audio freaks I know who have tubed amplifiers where the tubes are exposed. They are under the belief that their crappy human ears can distinguish the oh-so-slightly improved sound quality.
With a shot of my favorite black spray paint (98 cents a can), here's the project box with relay.

For the float switch, the old one was on a rod portion, and attached with a screw clamp. To replicate this rod portion, I took the fattest plastic hanger I could find and cut it up. To my surprise, part of the inside already had a hole. Using a long bit (masonry hammer bit), I finished drilling the center of the rod. I then drilled and tapped the one end of the rod to fit the float switch. The threading was M8-1.25 (metric). I don't have metric drills, but the 17/64 inch (0.26563"), bit was close enough to the required 0.26378 inch hole that was needed. From left to right, the new float switch, the new float switch attached to a piece of hanger rod, the old float switch.

I'm at a stand still right now because the numbering on the relay plug is different from what I'm use to......and the battery in my multimeter is dead to figure out the arrangement. TO BE CONTINUED!
Expenditure so far.......$5.53. If you want to include the paint (I had that sitting around, and it only took a squirt), add another $0.98.


