• Folks, if you've recently upgraded or renewed your annual club membership but it's still not active, please reach out to the BOD or a moderator. The PayPal system has a slight bug which it doesn't allow it to activate the account on it's own.

Inherited 90

redfishbluefish

Officer Emeritus
Officer Emeritus
Sagging Floor Saga

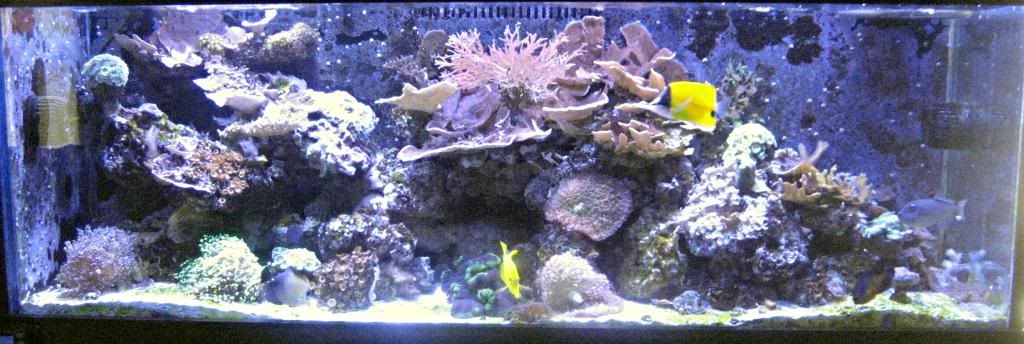
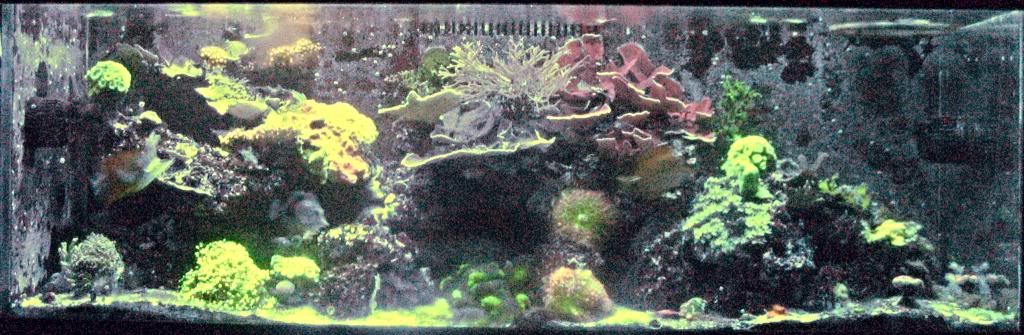
So here’s the latest thought process on the sagging floor due to the fish tank. But first I want to reflect on the advice given to me when this tank was first installed. I questioned the weight, and was vehemently told that there was no need to sister the joists…that a 90 gallon tank is nothing…a feather weight. I heard stories about 120/125 and 180 gallon tanks with no additional supports. So pooh pooh to those who gave me advice.

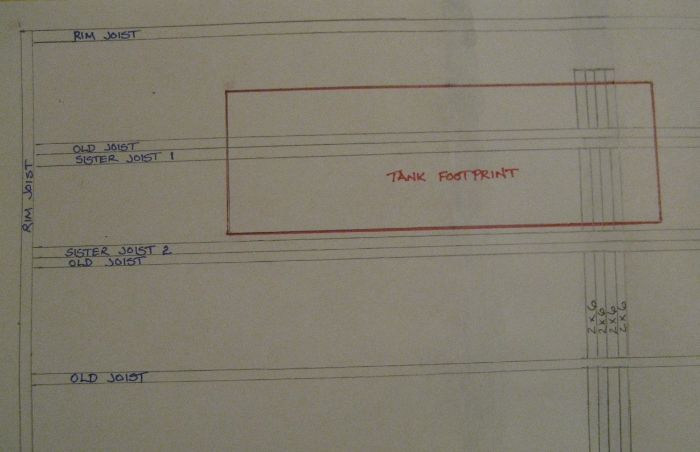
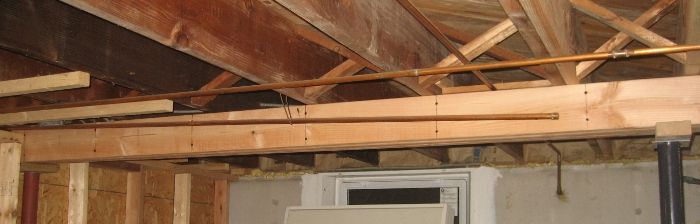
The above picture showing joist locations; the joists are actually a touch under 12 feet long (11’ 10”), and attached to one of the main triple beams in the house. The latest thought is to put a 2x6 beam perpendicular to the joists, right in the middle…about six feet along the joists. This would actually be four, 2x6’s that would be glued and nailed together. The span of this beam would be nine feet and supported by two adjustable jack posts that would eventually be buried in the walls. It just so happens that the position of this beam is under the right side of the tank. Here’s a bird’s eye view of the location of the new beam in relation to the foot print of the tank.

d7c0aab7-ced7-4906-9096-b3c88dda14a7_zps90a2674b.jpg


I’d appreciate comment, especially from the construction folks.
 
I am curious about the triple beam the sister joints are connected to and wether that is part of the sagging floor as well. Although 2x6's supported by jack posts would certainly help to take the weight off of the triple beam. Also have you considered a micro lam beam instead of the 2x6's? And does the floor run down hill to the triple beam as well? Just spit balling here cause, you know, I'm not there :)
 

redfishbluefish

Officer Emeritus
Officer Emeritus
Update on the New Beam Installation


I had to order the Jack Post I needed from Lowes. They originally told me it wouldn’t be in until January 12[SUP]th[/SUP] or 13[SUP]th[/SUP]. The day after Christmas I received a call that the post was in. So I purchased four, ten foot 2 x 6’s and cut them to nine feet and then glued and screwed them together. Screws were used every 18 inches. The beam was installed today. You can see the top of the jack post on the left buried in the stud wall. The one on the right is about six to eight inches off…waiting for the stud wall to be built.


0cbf2ee3-6a34-4f83-9dc1-461e796c7bcb_zpsbb79576d.jpg


I’ve only snugged the new beam up, and want to slowly tighten it up, and hopefully re-level the floor.


EDIT TO ADD: That pipe you see going across the beam and ending was for the radiator that was in the basement. I had to cut and cap that pipe to fit everything in.
 

Hockeynut

NJRC Member
Hey Paul sistering the joists should work but why not just add two in between and spread the weight over the whole span?
The back and front of the tank still appear to be just resting on the sub floor, the front looks to be close enough but the back looks to be in the center which could deflect a little.
Looks to be your sub floor is the old tongue and groove pine which is really strong but not as strong as 3/4 t&g ply
 
I don't think you would want to come to my house with your acute eye for things being level. My house was built in 1887 so its like rolling hills every ten feet or so.
 

Hockeynut

NJRC Member
Most houses are made of wood that was once a living creature, living creatures are hardly ever square or level so I say your right on the money with your rolling hills:)
 
Did you take the load off the floor before you added the extra support. I heard its really bad to do this while the load (tank) is full. Can cause damage to tank.
 

redfishbluefish

Officer Emeritus
Officer Emeritus
Hey Paul sistering the joists should work but why not just add two in between and spread the weight over the whole span?
The back and front of the tank still appear to be just resting on the sub floor, the front looks to be close enough but the back looks to be in the center which could deflect a little.
Looks to be your sub floor is the old tongue and groove pine which is really strong but not as strong as 3/4 t&g ply

Rob, the two joists closest to below the tank were sister’ed back before the tank was installed. I would have thought that this would have been enough…but obviously not..

The house was built in the late 40’s, where typical floor construction was pine plank sub floor, with ¾ tongue and groove oak floor. The combination of the two makes for a very strong floor system.


Did you take the load off the floor before you added the extra support. I heard its really bad to do this while the load (tank) is full. Can cause damage to tank.

Mark, I’ve jacked houses before so I’m aware of what simply jacking a house can do to plaster. In my case I’ve only snugged the new beam up to the joists and I’ll now slowly start to do quarter turns on the adjuster screws to start to bring the beam back up to where it was. As example, I did no adjusting today….i’ll start tomorrow.
 

redfishbluefish

Officer Emeritus
Officer Emeritus
What Goes Around Comes Around


Back on page one of this Tale (about 3/4 of the way down), I diagrammed the bubble trap I made that was used as water entered my refugium. I termed it the Rube Goldberg bubble trap:


IMG_2248.jpg


It worked, but it was bulky. So I mulled over some ideas and came up with my next lamebrain idea (Post 109 on page 11). I figured if I made the water path more tortuous, it would give the bubbles time to float away. Here you can see the pipe with the cuts ready to recieve the half round acrylic pieces:


IMG_4803.jpg


Well this new bubble trap was in the sump for over two years. I recently changed out my carbon, which requires pulling a bunch of stuff out of the side cabinet of the stand....exposing the side of the sump. And what do I see....salt creep growing down the side of the sump.


IMG_7441_zps6a5f4a3f.jpg


And it was as if I was blind to all the other salt creep I had around the sump:


IMG_7443_zpsefccc98d.jpg


Bottom line, this bubble trap wasn't working! The bubbles were popping and shooting saltwater all over the place. The dome to the refugium light was encrusted in salt.


So I went back to the Rube Goldberg with one little change. I put a knockout test cap on the bottom to stop bubbles from coming out the bottom.


IMG_7446_zpsa868fbd2.jpg


So with the Rube Goldberg back in place, I'm only getting very small microbubbles coming out. Have to wait to see if these will cause creep.....my mind is already humming thinking of ways to stop the micro bubbles.


IMG_7448_zpsc6c315c6.jpg
 

redfishbluefish

Officer Emeritus
Officer Emeritus
Haven't done this is awhile....full tank shot. I wish I had a decent camera or knew what I was doing. Here is what I got with my little point-n-shoot camera:


IMG_7462_zps87ea26f5.jpg
 

TanksNStuff

Officer Emeritus
Officer Emeritus
Paul, I think you could have done a better job sketching the tank than that photo! :tongue: Just kidding, heh.

Wow that was a lot of salt creep. Hope good ole Rube 2.0 works out for you.
 

fatoldsun

NJRC Member
What Goes Around Comes Around


Back on page one of this Tale (about 3/4 of the way down), I diagrammed the bubble trap I made that was used as water entered my refugium. I termed it the Rube Goldberg bubble trap:


IMG_2248.jpg


It worked, but it was bulky. So I mulled over some ideas and came up with my next lamebrain idea (Post 109 on page 11). I figured if I made the water path more tortuous, it would give the bubbles time to float away. Here you can see the pipe with the cuts ready to recieve the half round acrylic pieces:


IMG_4803.jpg


Well this new bubble trap was in the sump for over two years. I recently changed out my carbon, which requires pulling a bunch of stuff out of the side cabinet of the stand....exposing the side of the sump. And what do I see....salt creep growing down the side of the sump.


IMG_7441_zps6a5f4a3f.jpg


And it was as if I was blind to all the other salt creep I had around the sump:


IMG_7443_zpsefccc98d.jpg


Bottom line, this bubble trap wasn't working! The bubbles were popping and shooting saltwater all over the place. The dome to the refugium light was encrusted in salt.


So I went back to the Rube Goldberg with one little change. I put a knockout test cap on the bottom to stop bubbles from coming out the bottom.


IMG_7446_zpsa868fbd2.jpg


So with the Rube Goldberg back in place, I'm only getting very small microbubbles coming out. Have to wait to see if these will cause creep.....my mind is already humming thinking of ways to stop the micro bubbles.


IMG_7448_zpsc6c315c6.jpg
I bailed on this model with my post-move setup. Saved the old rube-trap in case the club ever opens a wax museum.
 

redfishbluefish

Officer Emeritus
Officer Emeritus
Today was a geat day to tinker.


I purchase a used Eheim Everyday Feeder a while back and didn't realize it was missing the mounting bracket until I got home. Well today I made that bracket for the feeder, modelled off of the original bracket. Half inch plexi screwed together with stainless steel screws (and a little one-drop glue). A nylon thumb screw wasn't available, so I made one out of a two inch bolt and wing nut....again, bolt glued in place with one-drop.


IMG_7469_zps08e8a074.jpg
 

redfishbluefish

Officer Emeritus
Officer Emeritus
Out with the Old, In with the New


Since going over to biopellets, the refugium is no longer needed. In fact, the Cheato that was there disappeared within a month, and the hair algae, that was longer then Fabio's hair, has almost completely disappeared as well. So the thought is to switch over the refugium to a frag tank. But first the issue with the light. The light I have now is a "home" LED spot light that is only good for growing algae:


IMG_2432.jpg


I was lucky enough to pick up a small Eshine 24 - 3 fixture for NyteGTI today that should easily work for a frag light. Easy install with two cables and the light was in:


IMG_7473_zpsd97da18d.jpg


I have this set on the lowest setting, and it's still pretty bright.
 
Last edited:
Top