• Folks, if you've recently upgraded or renewed your annual club membership but it's still not active, please reach out to the BOD or a moderator. The PayPal system has a slight bug which it doesn't allow it to activate the account on it's own.

jpelzer's 240 in-wall reef

So it's taken me a while to get this thread started, and of course the tank is still very much a work in progress. But enough has happened that I better start documenting before I start to forget.

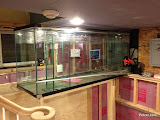
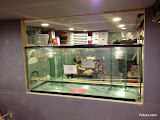
As you can see from my 'member since,' I've been in the hobby for while, a little over a decade. My original saltwater tank was a 90 gallon AGA that I purchased complete from a coworker... Live rock, fish, and bio-ball-filled canister filter included. His had been a FOWLR with the old-school fluorescents over it. I replace everything except the chiller -- those first few years, I spent like a madman, upgraded to halide and CF bulbs, added an AquaC skimmer, lots of flow, and had good success... I attribute most of that to keeping the tank understocked. Here's a shot circa 2004:
IMG_1764.JPG

But circumstances changed, that tank was in an apartment, and I had to break it down. I swore I'd never have another saltwater tank until I owned a house, and I dropped out of the hobby for a bit. In 2009, I purchased a house in Tenafly, NJ. I immediately started scouting each room for the best location, rapidly settling on the dining room, where I planned to build out a window seat, and have the tank built into the side. But that would have to wait, since I wanted to tear down walls, redo the bathroom, finish the basement... All sorts of things!

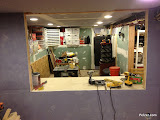
Speaking of the basement, it was totally unfinished... Concrete floors, fieldstone walls up to grade, then cinder blocks above that. Heating and water pipes running everywhere, and a giant (ancient) boiler in the middle of it all. Here's a shot of that beauty:
L1050505.JPG

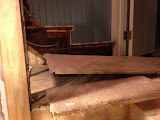
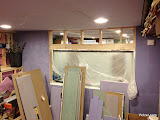
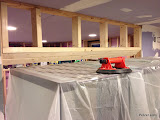
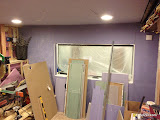
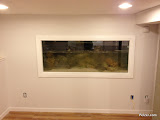
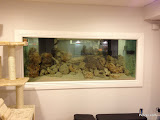
I pulled out that boiler, replaced it with a modern model that vents out the side of the house (no need for a chimney), moved all the pipes into the ceiling, and went about finishing the basement. Only near the end, as I was laying the floors did I realize that I should put the tank down there! No need to reinforce anything... No worry about spilling on the nice new wood floors (still not installed upstairs) Joists open, so I can run power... And it can be BIGGER!!! Everything was perfect. So I pulled out the new wall that I had built, and began construction of an in-wall tank and stand. The tank is 72" long, 24" deep, and 31" tall. I wanted the tallest tank I could get where I could still reach the bottom. If I could have fit a larger tank, I would have, more on that later. Here's the design plan I went from.

Basement%u00252520tank%2520stand.jpg
 
So I then went to work:


Getting the tank in proved to be a challenge. I'd measured a million times, even created a full-scale mockup of the tank out of scrap wood, that I manipulated through the side door and down into the basement. But I hadn't taken the tank's weight into account, nor the fact that the suction grips would't fit on the side of the tank while it was making its way down the stairway (which is about 27" wide). The one saving grace was that the basement has a 12" ledge that goes around the entire place (where the fieldstone cuts back and the foundation transitions to cinder block), so I built a crude brace so we could rest the tank on that ledge once we got it through the door, collect ourselves, then do the final move through the room and onto the stand.

In order to get the tank through the door, I had to remove to steps from the staircase (subsequently rebuilt):


Here's the tank in, resting on that ledge:


And finally it is in place, special thanks to Jayson and Sung!


Next step, frame it in. The beam is angled from the back so it doesn't block any light penetration. Word to the wise: Do this before you put a tank in, if at all possible. This was REALLY challenging to finish and sand with the tank there. Timing forced me to do it this way.


And skip forward a bit, you can see the base rocks are in, the sand is in, and the first round of water is on its way. I ran freshwater for a while, since I had about 100lbs of rock from my old 90 gallon tank in there, as well as much of the sand. I wanted to suspend as much garbage as possible, then flush it all down the drain and refill. On the right, you can see the remains of the chimney, so that old boiler would have been pressed up against the glass on the right side of this shot.


And here it is with the rest of the rock in:


Up next: Equipment (I have to take some photos for the next installment)


Last edited:
Thanks guys! So I don't have a lot of photos of the other side of the wall, I'll get those going soon. But here's a breakdown of my system:

Tanks:
  • 240 gallon glass tank with starfire front panel (72x24x31)
  • 65 gallon acrylic sump
  • 20 gallon glass skimmer tank
  • 20 gallon glass mix tank
  • 29 gallon glass RO tank
  • 16 gallon acrylic frag tank
  • 20 gallon glass QT tank
The skimmer tank is up at chest level, one of my peeves from my old tank was getting down on hands and knees to clean the skimmer. So the only reason that tank exists is so that I have have a tall skimmer, and don't have to bend over to clean it. Water is pumped there off a T from the main return pump. It overflows from the skimmer tank and either goes straight down into the mixing tank, or back to the sump.

The mixing tank is directly under the skimmer tank, and normally has flow going directly from there back to the sump. I'm able to take it offline by closing two 2" ball valves. Then I switch on a Mag 7 which pushes the water up to the ceiling and over to the other side of the basement to a slop sink. Once drained, I open another valve from the RO tank, refill. Then I turn on a korallia in the mixing tank (this is via my Apex controller) which also signals the heater to come on in that tank (the heater only runs while the mixing pump is on). I dump in 4.25 lbs of salt, walk away. Once it's cleared up, I add the tank back into the system flow. I couldn't stand having buckets everywhere. It's only a 5% water change, but I think how easy it is makes it OK, I can do a change every day if I want.

The RO tank sits up on a ledge, higher than the skimmer, sump, and mixing tanks. It has a mechanical float valve at the top of the tank where the RO water enters. This valve is just insurance. The flow control is from a solenoid controlled by the Apex and two float switches. When the water drops below the bottom float, the solenoid switches on and fills the tank until the top float switch switches it off. That way, I minimize the RO on/off cycles and the 'bad' water being added is minimized. Someday I might add a second solenoid to dump the first cup or so of water, but I really don't think it's necessary. The ATO system also pulls from this tank.

The ATO is a Tunze Osmolator, still kicking from my original tank. The RO flows through an Avast Marine K1 Kalk Stirrer and then into the skimmer tank, and down into the sump (where the actual topoff sensor lives). The main skimmer is an Avast Marine CS1 with recirculation mod, with a Swabbie neck cleaner.

I also have a Pro-Cal dual-chamber calcium reactor, not yet running. That's also from my old tank, though I've newly added a pH probe so I can actually control this puppy. It was hit-or-miss before.

Main pump is a ReeFlo Snapper, pushing back to the display, over to the skimmer tank, and through a BRS dual-chamber reactor running GFO and GAC. Return is a 1" line, broken down to two 3/4" returns on either side of the tank. Overflow lines are a single 1" line in full-siphon mode, and two 1.5" durso standpipes (1 on either side of the tank).

In-tank flow is from two Sicce Voyager HP 4000's doing a semi-random cycle. I originally purchased a Vortech, but have since sold it due to noise.

Control is via a Neptune Systems Apex with 20 controlled outlets. I also have a SenEye monitoring device, though the jury is still out on its utility.

Next post will be about lighting, and have pictures!
 
So I had a setback, with dinoflagellates taking over and smothering my corals. I fought for a few days with a turkey baster, but it got to the point where I'd clean them off, only to find them covered again just a couple hours later.

I did the following:
* Cut back on feeding
* Stopped vinegar dosing (to raise pH)
* Did a full cleaning on my kalk reactor, all fresh kalk (to raise pH)
* Turned off all lighting for 2 days
* Brought lighting back at 50%, 4 hours a day, adding an hour of daylight per day

At this point, dinos are gone (at least not visible, and no bubbles) and the corals are recovering. I have almost 20 frags that I added right before the peak (still sitting on lighting grate), most of which seem to have pulled through. My other corals all seem to have come through, slightly worse for wear, but alive. Clam is fine, fish are fine.

Speaking of fish, I don't think I've given a livestock list. Current residents:
* Purple Tang
* Hippo Tang
* Yellow Assessor
* Blue Dot Jawfish
* Cherubfish
* Randall's Goby (theoretically there is a tiger pistol shrimp in there for him too, but I've never seen it since adding)
* 3x Lyretail Anthias
* 6x Green Chromis
* 2x Ocellaris Clowns
* 2x Peppermint shrimp (I've seen one of them carrying eggs)
* 3x Mithrax crabs (Carrying eggs as well: http://youtu.be/TXou2c7646o)
* Fighting conch
* Lipstick conch
* Derasa Clam
* A bunch of snails and hermits
 

dnov99

FRAG SWAP VENDOR
Good job! In the future if they do return, turkey basting them just spreads them more throughout the tank. When I had them I found that siphoning them out with thin tubing worked best.

Sent from my DROID2 GLOBAL using Tapatalk 2
 
Yeah, I think that's good advice. I wasn't able to siphon very much, partly due to the way I have to access the tank from the back, and partly because I was thinking big big big for the siphon. Seems so obvious, a hard tube + some airline might have worked way better.

In any case, I think the lighting was the big change, though I'm afraid to resume vinegar. Perhaps I'll switch to vodka.
 

dnov99

FRAG SWAP VENDOR
Seems so obvious, a hard tube + some airline might have worked way better.

This is exactly what I used. PVC with tubing that fit snugly inside. Works like a charm.

Also vodka or vinegar is same principal. I would refrain from dosing anything for another couple of weeks, just to be sure its gone.
 
Also vodka or vinegar is same principal. I would refrain from dosing anything for another couple of weeks, just to be sure its gone.
My concern with the vinegar was that it brings my pH down a bit, which can help the dinos grow. So I'm thinking that when I resume dosing, I'll switch to vodka. I don't think the vinegar was the cause, more likely just a new-tank thing + low(ish) pH. Day to day my pH is now 8.2-8.4, still not high but probably better.

In other news, JAWFISH! My blue dot jawfish decided to build a new burrow, and I managed to catch him (and my purple tang and Randall's goby) in a little video:
[video=youtube_share;KEBUBiCbbas]http://youtu.be/KEBUBiCbbas[/video]
 
Dinos seem under control these days. Bringing new lighting online now. Finished my second home built LED module: 12x 3w Cree XPE cool white, 12x 3w XPE Royal Blue, 6x 3w XPG Warm White.

aa14239c-73f2-7d94.jpg


Housing is stainless steel, laser cut. I'm pretty pleased with how it came out, just three more to build. Total of 5.
 
I finally finished the 5 LED modules... Took about 9 months, though obviously in fits and starts. All the LEDs have carclo wide ripple optics.

y8ehe5ed.jpg


So that is 24x Cree XPG warm white, 60x XPE cool white, 60x XPE royal blue, 2x AI Sol Blue, 2x 4' magenta and blue stunner strips.

So, about 600w of LED lighting total, though I can't run it all at 100%.
 
Top